
Workflows
Automate Reviews and follow-up actions.
Reviews are often started by hand from a project. Workflows automate that: one trigger starts a graph of steps (actions and logic) when something changes in a connected system or inside Clearly AI.
Prerequisites
- A Clearly AI project and review template you can use for a normal review (Reviews).
- The right integrations connected and authorized (Jira, GitHub, ServiceNow, Linear, Slack, and others your workflow lists as required).
How workflows are structured
- Each workflow has exactly one trigger step. The editor enforces this when you save.
- Other steps are actions (create a review, post a comment, send email, and so on) or logic nodes (for example Branch Workflow, Join, Simple Branch).
- Steps are nodes on a canvas; you connect them with edges so the run follows your intended order. A yellow indicator on a node means configuration is incomplete; green means required fields look valid.
Think in terms of: something happens (trigger) → optional branching or filters (logic or specialized filter steps) → things Clearly AI does (actions).
Figure 1 shows the graph editor: Available Steps on the left (search, integration filters, and trigger cards), the canvas with connected nodes and the minimap, and Configure Step on the right for the selected node. When the graph passes checks, the Workflow Validation bar shows a green state (Figure 2).
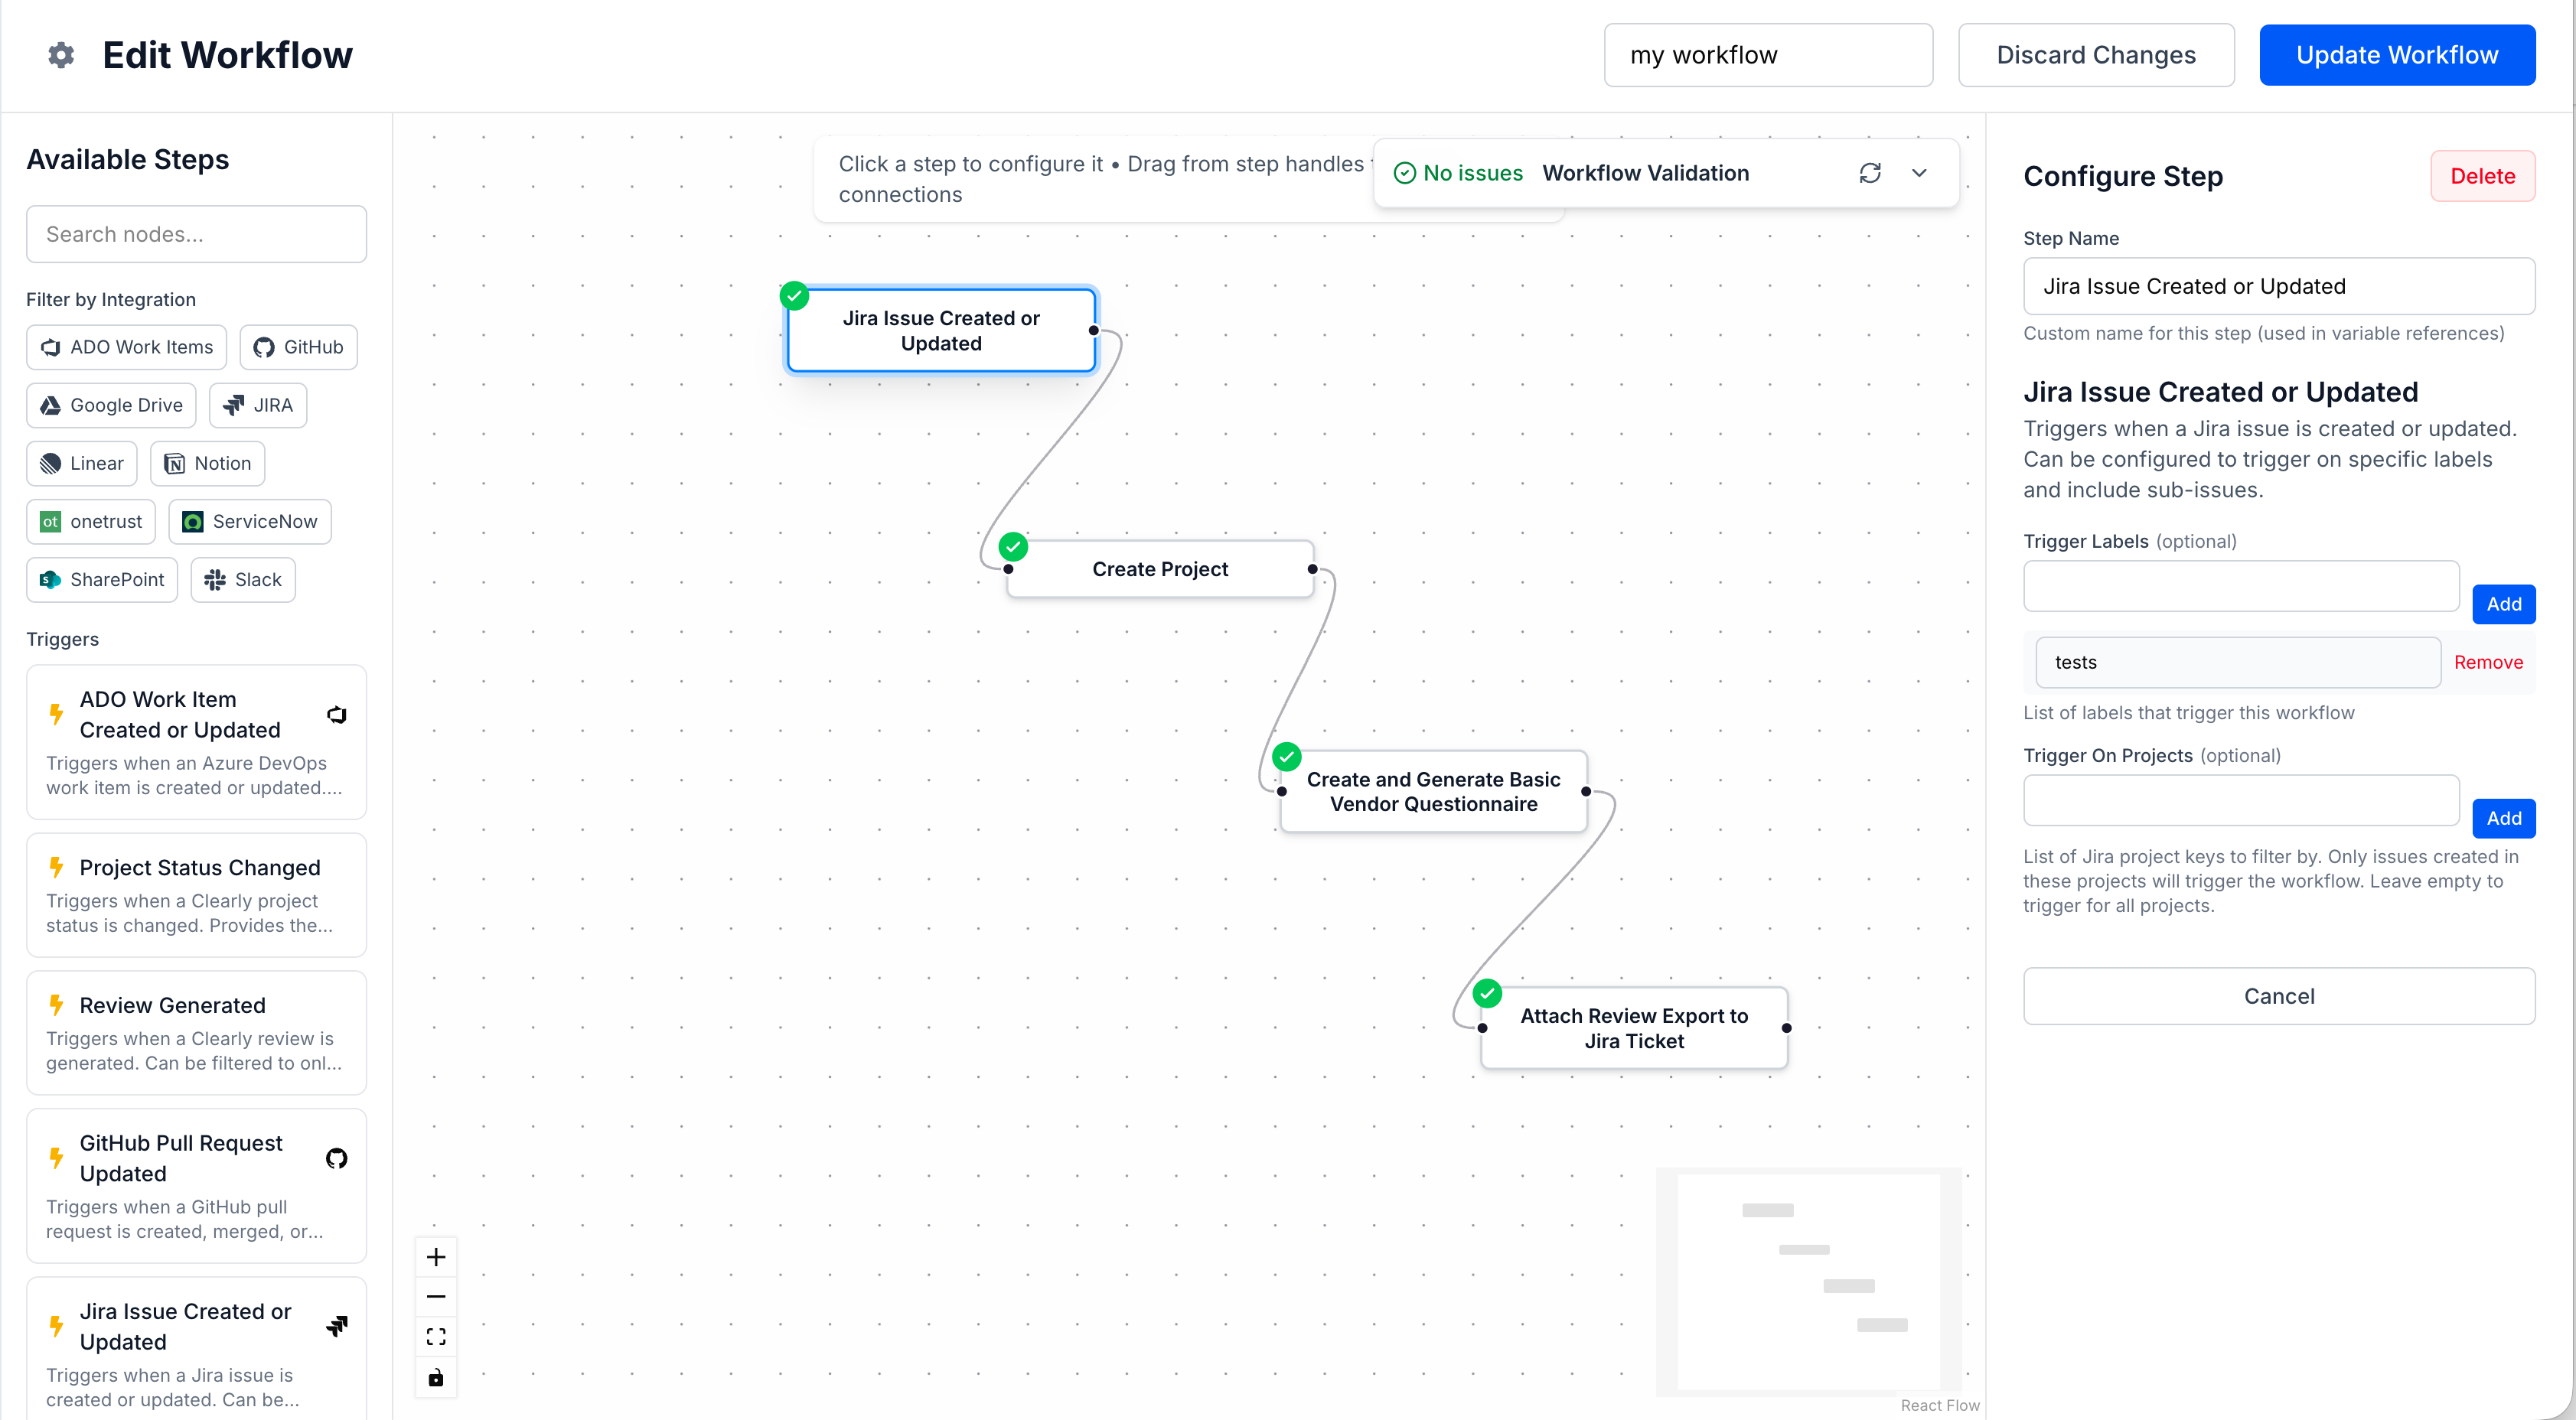
Figure 1. Graph editor: step palette, canvas with a Jira trigger and downstream actions, step configuration, zoom controls, and minimap.

Figure 2. Workflow Validation with No issues (expand the bar for details when the product surfaces warnings or errors).
Create or open a workflow
- In the sidebar, open Workflows (labeled Workflows; the product shows a BETA badge in some builds). You should see the list in Figure 3.
- Click Create Workflow. You start from a template chooser (Figure 4), then land in the graph editor where you name the workflow and add nodes. The editor layout (palette, canvas, configuration panel, Update Workflow) matches Figure 1.
- To change an existing workflow, open it from the list and click Edit.
The Workflows list (Figure 3) is where you see Create Workflow, each workflow’s Enabled toggle, last run metadata, and actions such as view, edit, and delete. Saving from the editor updates the workflow definition. Enabling automation is done from this list: use the Enabled toggle on each row. If integrations or webhooks are missing, the UI can block enabling and point you to Integrations setup (template cards in Figure 4 show integration and webhook status on each card).

Figure 3. Workflows overview: Create Workflow, table columns including Enabled and Last status, and row actions.
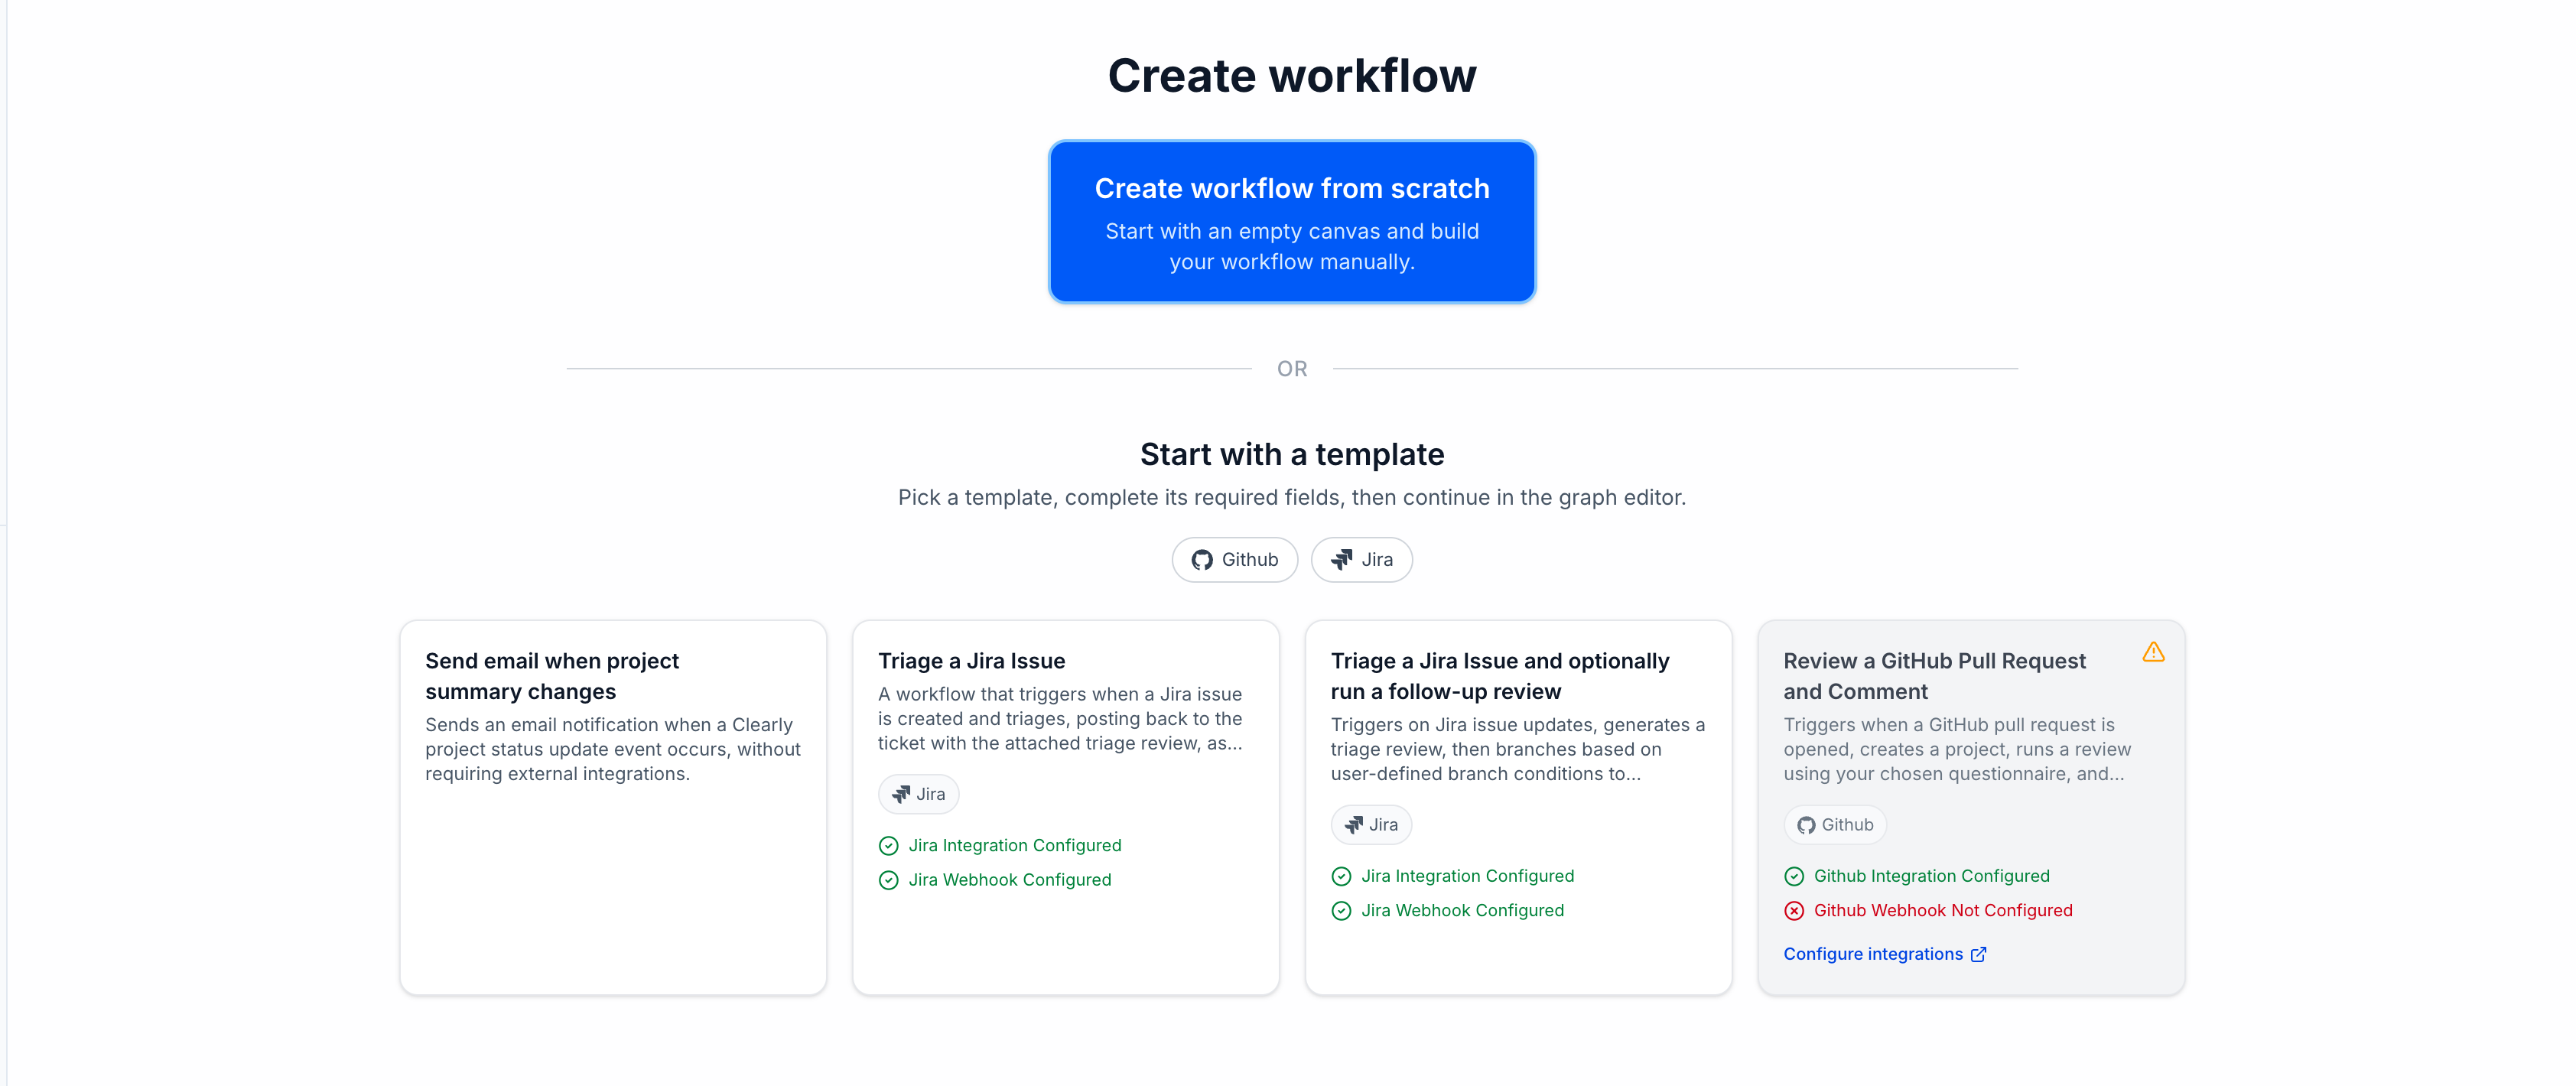
Figure 4. Create workflow: start from scratch or pick a template; filters and per-template integration or webhook readiness.
Triggers (what can start a run)
Available triggers depend on what your organization has connected. The built-in trigger types include:
| Trigger (display name) | Integration | What you configure (summary) |
|---|---|---|
| Jira Issue Created or Updated | Jira | Optional Trigger Labels and Trigger On Projects lists to narrow which issues count |
| GitHub Pull Request Updated | GitHub | Update action (for example opened or reopened, merged, label added, assignee added, reviewer requested), optional Repository (filter), Allow draft pull requests |
| GitHub Repo Webhook Event | GitHub | Optional Webhook event type and Repository (filter) to run on broader repository webhook events |
| Azure DevOps Work Item Created or Updated | Azure DevOps | Optional tags, projects, and states |
| Linear Issue Created or Updated | Linear | Optional labels and teams |
| ServiceNow Record Created or Updated | ServiceNow | Trigger On Tables (for example incident, change_request) |
| Clearly AI Project Status Changed | None (Clearly AI) | Status and project filters |
| Clearly AI Review Generated | None (Clearly AI) | Optional review template and project filters—fires after a review finishes generating |
Use GitHub Pull Request Updated for PR-specific automation. Use GitHub Repo Webhook Event when the workflow should start from another repository webhook event your GitHub integration receives, such as an issue, push, or workflow run event.
In the editor, open Available Steps and use Search nodes or the integration chips to narrow the list; trigger types such as Jira Issue Created or Updated and Project Status Changed appear as cards you drag or add from that palette (Figure 1).
LLM instructions in workflow steps
Many steps do not ask you to paste static text. Instead you write instructions: natural-language prompts that Clearly AI sends to the model together with workflow context (trigger payload, prior step outputs, and any values you insert). The model then drafts the body of a comment, ticket, email, document, or similar.
Where instructions appear
Typical instruction fields (names match the node configuration UI):
- Comment instructions — Comment on GitHub Pull Request, Create Jira Comment, Create ADO Work Item Comment, Create Linear Comment, Create ServiceNow Comment
- Ticket / work item body instructions — Create Jira Ticket, Create Linear Issue, Create ADO Work Item, Create ServiceNow Record
- Email Body Instructions — Send Email (you also set subject and recipient list separately)
- Message instructions — Send Slack Message to User (direct message to a Clearly AI user, resolved to Slack)
- Document / page content instructions — steps that create Google Docs, Notion pages, or SharePoint documents
Each field is a multiline control. The short help text under the label (copied from the product) explains that the AI uses your instructions plus context to generate the final content.
Create and Generate Review does not use a free-form instruction box. You choose Creator, Reviewer, Review Template, and Project. The review uses that project’s sources as it would for a manual review, so the project must already contain the files or integrations you expect.
Inserting data with @ mentions
Instruction fields (and a few other text areas) support variables from upstream steps:
- Type
@where you want a value inserted. A suggestion list opens, scoped to what earlier nodes expose (for example issue key, PR title, review URL). - Pick an item. The editor stores it as a token; in the saved workflow this becomes a
{{path.to.value}}reference (double curly braces around an internal path).
You can mix plain language and tokens in one instruction, for example:
Post a short summary for reviewers. Link the Clearly AI review: {{create_and_generate_review.clearly_review.review_url}}
Mention the Jira issue {{jira_issue_updated.jira_issue.issue_key}} in the first sentence.
Tips
- Prefer specific directions: audience, tone, length, bullets vs paragraph, what to omit, and whether to include links or metrics.
- If the model omits a fact, ensure that fact exists in context—either from the trigger or from a prior step—and consider inserting it explicitly with
@. - Branch Workflow (below) uses the same
@mechanism for its prompt.
Branch Workflow: LLM chooses the next path
The Branch Workflow node is a logic step. You connect it to two or more downstream steps on the canvas. In Branch Conditions you write a branching prompt: instructions that describe when to follow each branch. The model reads workflow context and your prompt, then selects which connected steps to run next (the product supports multi-branch and confidence-style behavior per the node description).
The editor shows:
- Helper copy: Describe the conditions for branching. Type @ to insert variables from upstream nodes. Reference steps by their name or describe them naturally.
- A list of Connected steps so you can align your wording with what you wired on the graph.
Example branching prompt
If the pull request touches files under src/auth/ or src/crypto/, run the heavy security review branch.
Otherwise run the light triage branch only.
Use the PR title: {{github_pull_request_updated.github_pull_request.title}}
You must connect at least one outgoing edge before the branch configuration can be saved.
Common action steps (non-LLM configuration)
- Create and Generate Review — Select Project, Review Template, Creator, and Reviewer. Waits until generation completes; downstream steps can use the review outputs.
- Attach Review Export to … — Attaches an export (type you select) to Jira, Linear, ADO, ServiceNow, etc., when your workflow already has a Review in context.
- Scan Project With Snyk — Imports supported repository sources on a Project into Snyk and attaches the resulting Snyk projects as sources (Snyk).
- Assign … — Assignment steps for Jira, Linear, ServiceNow, ADO.
- Filter: Project Has OneTrust Asset Source — Continues only if the project includes a matching OneTrust asset source; otherwise the branch stops.
Manual runs, run history, and logs
Open a workflow from the list to inspect it read-only on the canvas.
- Runs tab — Past executions; select one to highlight progress on the graph.
- Manual Run tab — Manually Start Workflow emits the same kind of event as your trigger (for testing), when the trigger type is known.
- Workflow Run Logs — Collapsible panel at the bottom when a run is selected; shows per-step log lines.
Figure 5 shows a workflow opened from the list: Runs and Manual Run in the left rail, a completed run selected, and the graph on the canvas (the banner prompts you to select a run to see execution status on the nodes).
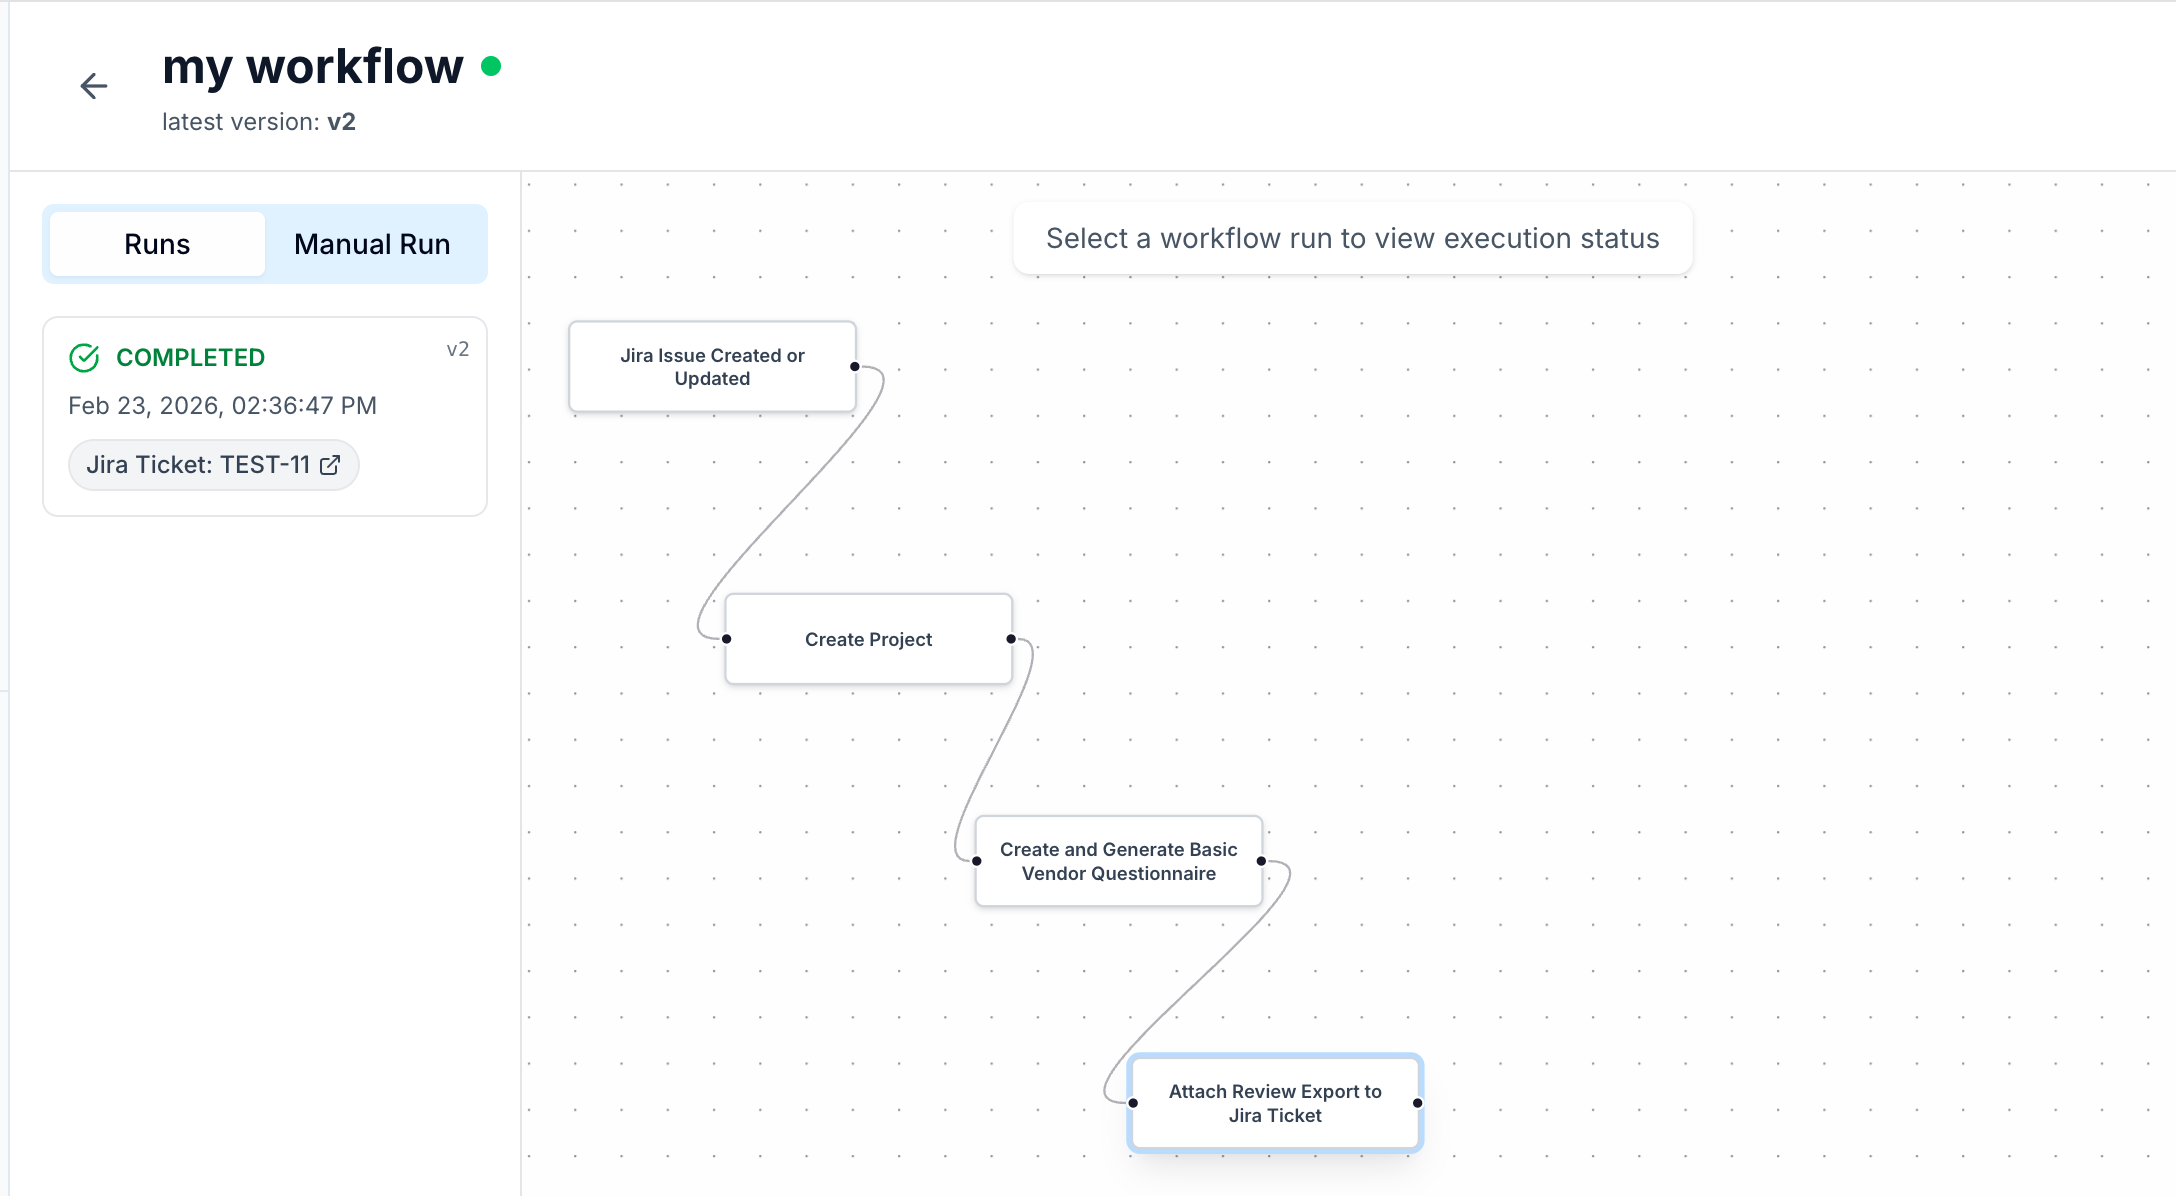
Figure 5. Workflow detail: Runs / Manual Run tabs, a COMPLETED run row, and the graph (select a run to align status with nodes).
Examples you can adapt
Jira label-driven review
| Piece | Example |
|---|---|
| Trigger | Jira Issue Created or Updated — Trigger Labels includes needs-security-review |
| Filter | Same trigger: Trigger On Projects lists only the Jira projects you care about |
| Action | Create and Generate Review on the Clearly AI project that holds design sources |
| Follow-up | Create Jira Comment with Comment instructions asking for a concise summary and the Clearly AI review link using @ to insert review_url from the create-review step |
Figure 1 and Figure 5 both show Jira-triggered graphs (trigger plus Create Project, review generation, and export-to-Jira style steps) you can compare to this pattern.
GitHub PR opened on main
| Piece | Example |
|---|---|
| Trigger | GitHub Pull Request Updated — Update action = Opened or reopened; Repository (filter) set to your repo |
| Logic (optional) | Branch Workflow prompt describing when to skip draft or trivial PRs, using @ fields from the PR trigger |
| Action | Create and Generate Review on a project whose sources include the repo (or follow-on steps your org uses) |
| Notify | Comment on GitHub Pull Request — Comment instructions to post a short summary and link (insert tokens for review URL and issue key if available in context) |
The Review a GitHub Pull Request and Comment template on Figure 4 is a practical starting point; resolve webhook warnings on the card before you enable the workflow.
FAQs
What’s next
| Topic | Link |
|---|---|
| Reviews | Reviews |
| Review Template catalog and editing | Review Templates |
| Integrations | Jira · GitHub · Slack · ServiceNow |