
Risk Registry (Beta)
Track risks from reviews and manual findings through ownership, mitigation, acceptance, and history.
Risk Registry (Beta) is a system of record for security and compliance risks that need follow-up after review.
Use it to track who owns a risk, how severe it is, what remediation is planned, whether it was accepted, and what evidence or review produced it.
Risk Registry is in beta and must be enabled for your organization. If you do not see Risk Registry or Risks, ask your administrator or Clearly AI.
Open Risk Registry
Open Risks from the sidebar.
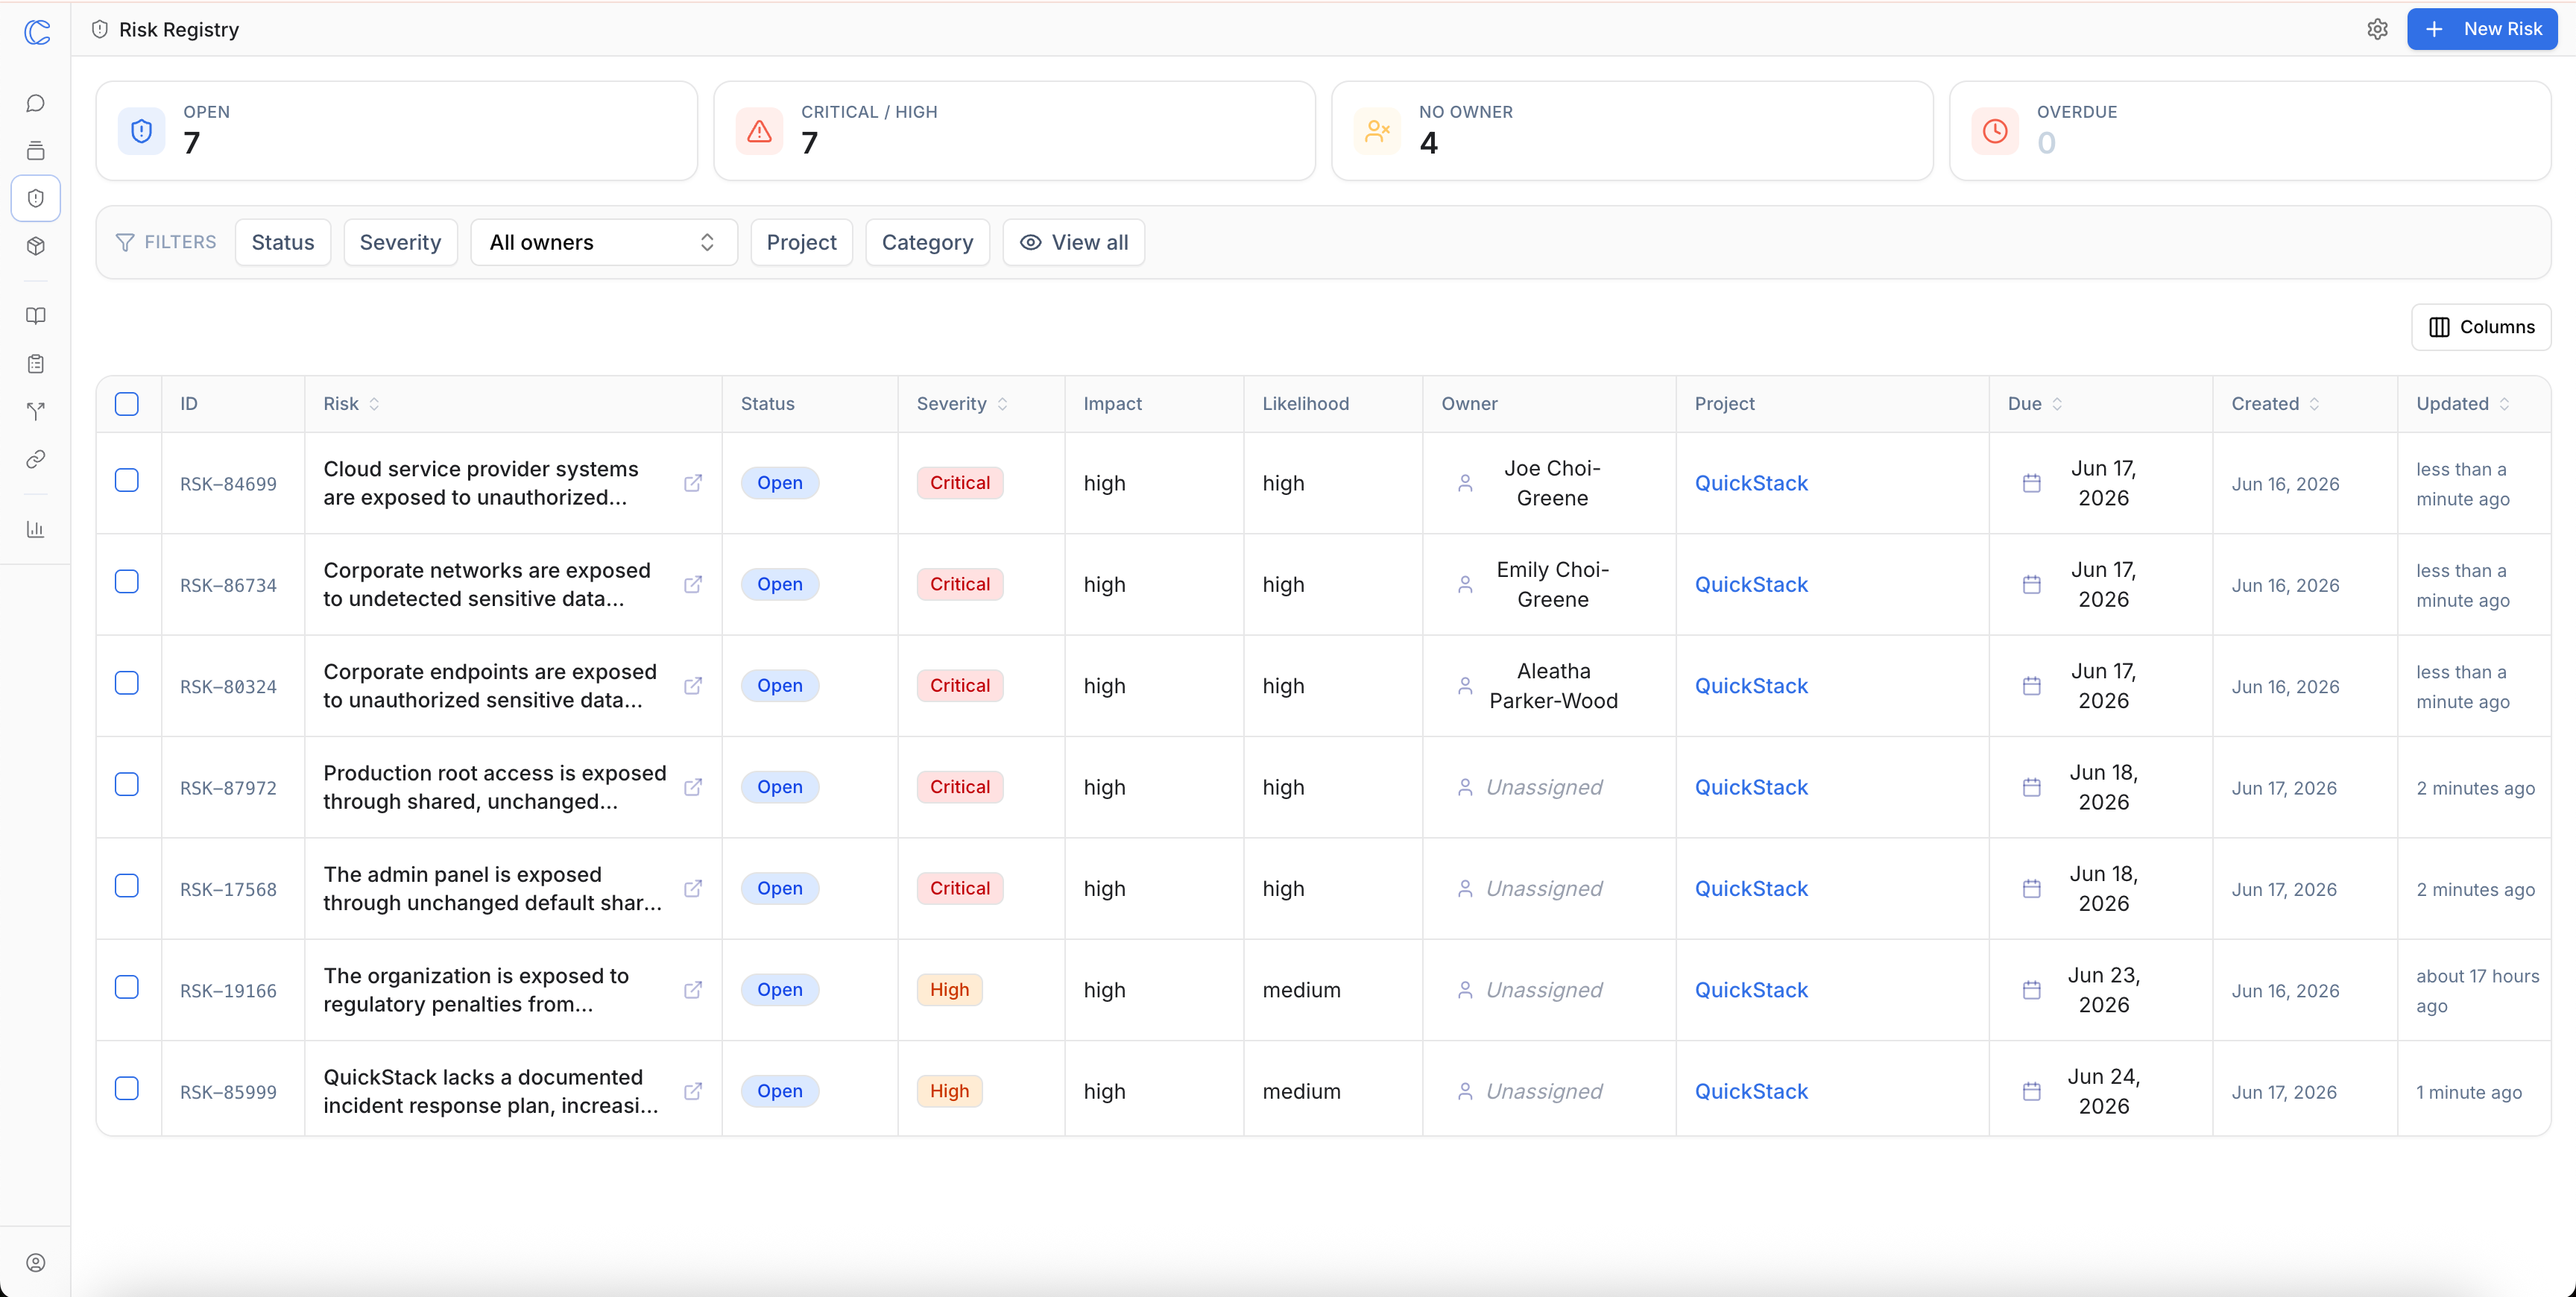
The list page shows:
- Open Risks
- Critical & High
- Unowned
- Overdue
- Filters for Status, Severity, Owner, Project, and Category
- New Risk when you have edit permission
The risks table shows a Severity column, with Impact and Likelihood available as optional columns you can show from the column menu. Click a column header to sort by it. By default risks are sorted by Severity, then Due Date, then most recently updated.
If draft risks exist, the page shows a banner such as draft risks need triage with View drafts.
How risks are created
Risks can be created in two ways.
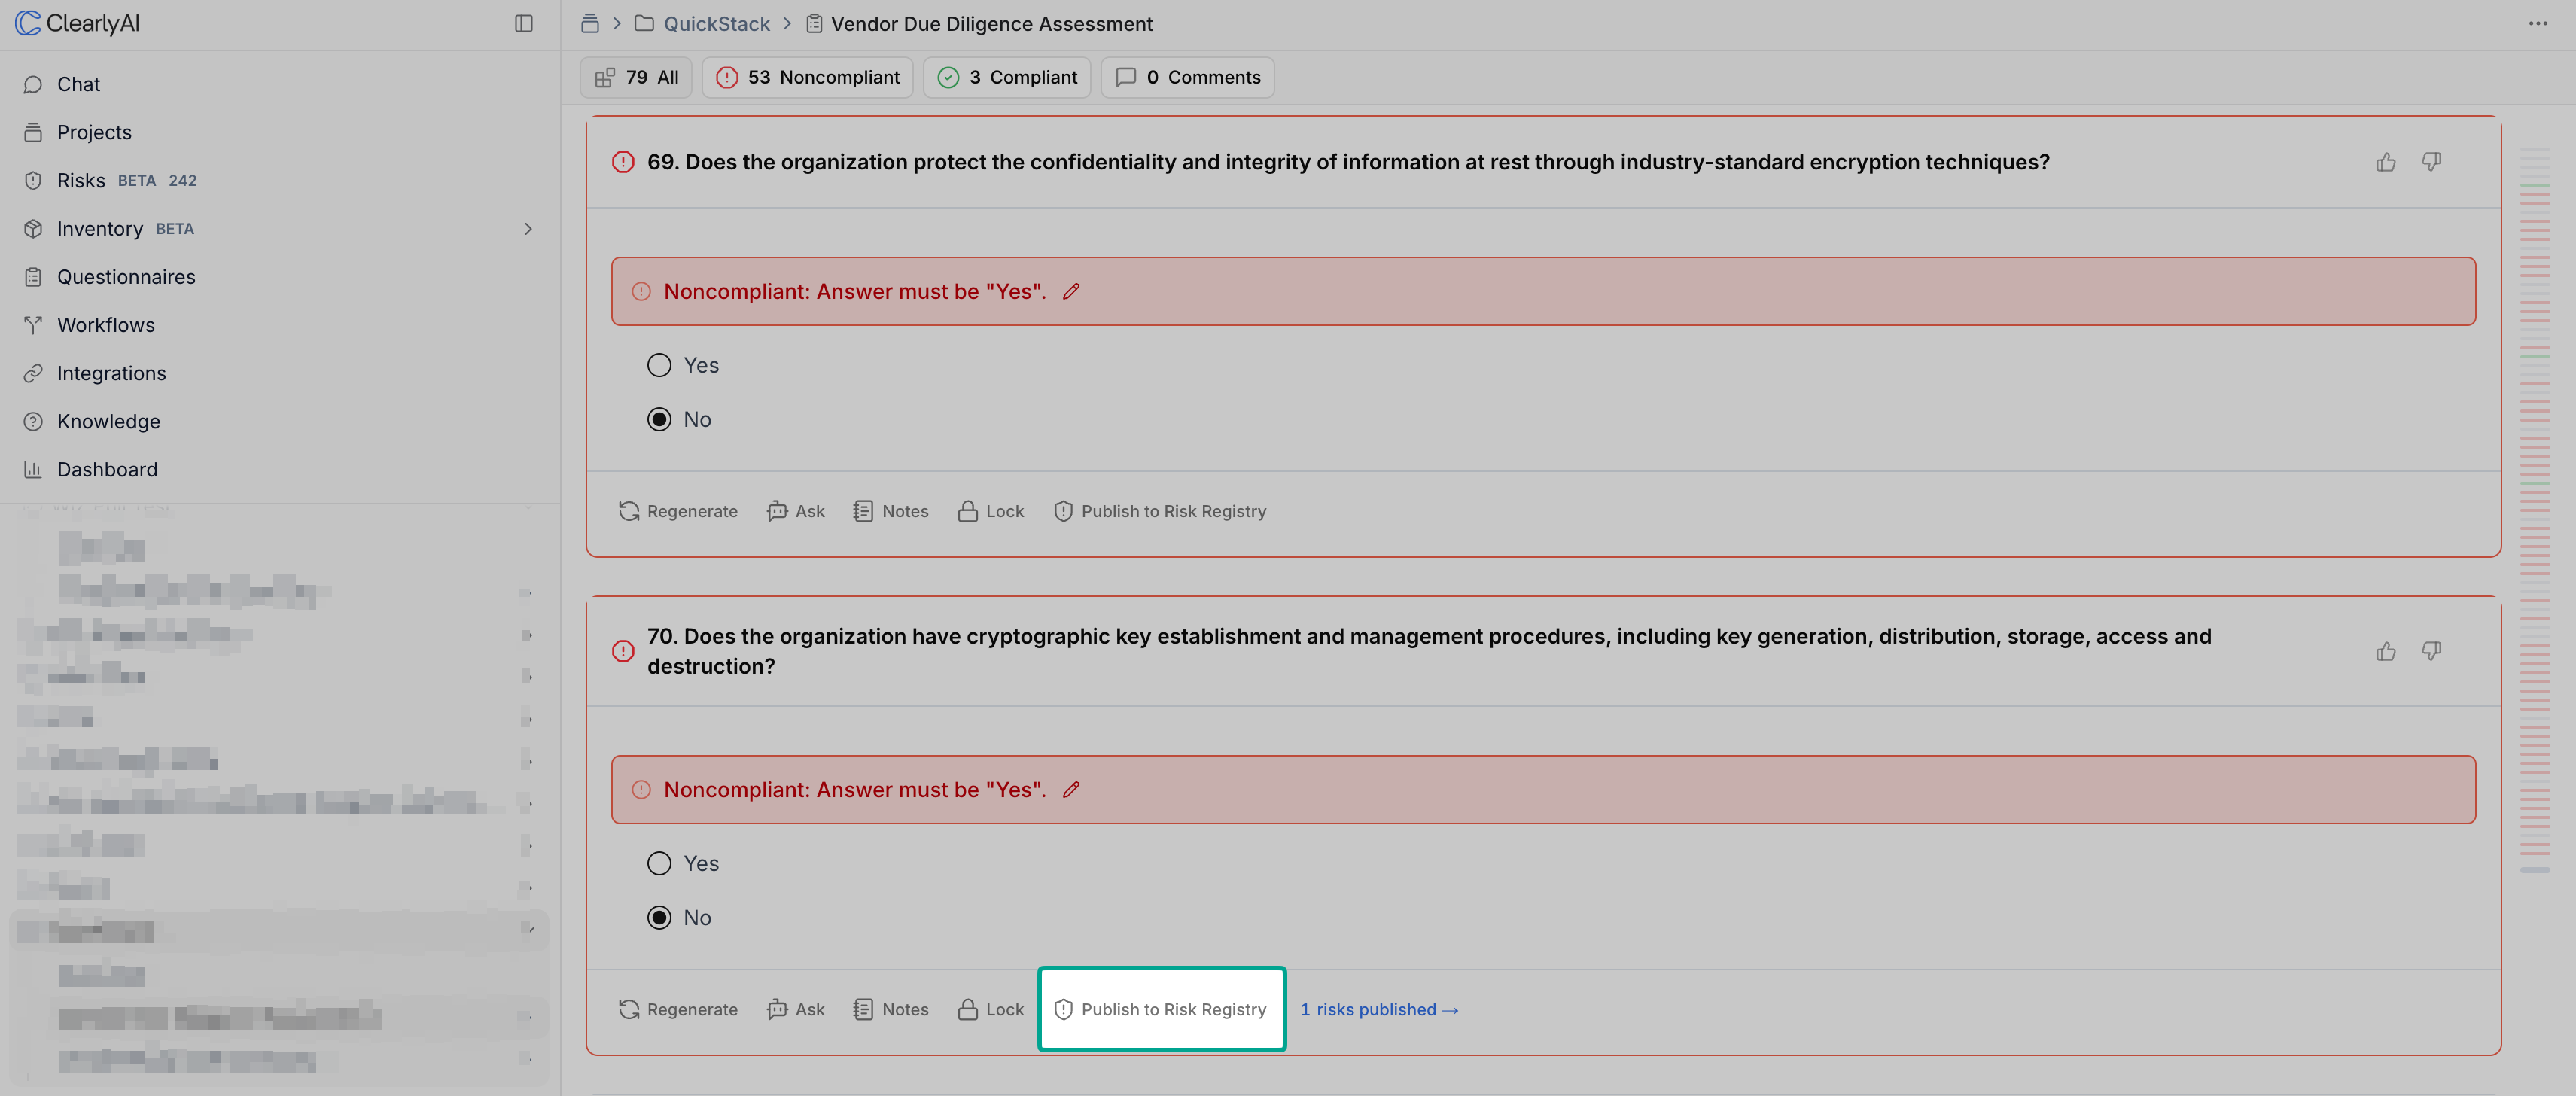
Published from reviews: Use Publish to Risk Registry on a review or an individual answer.
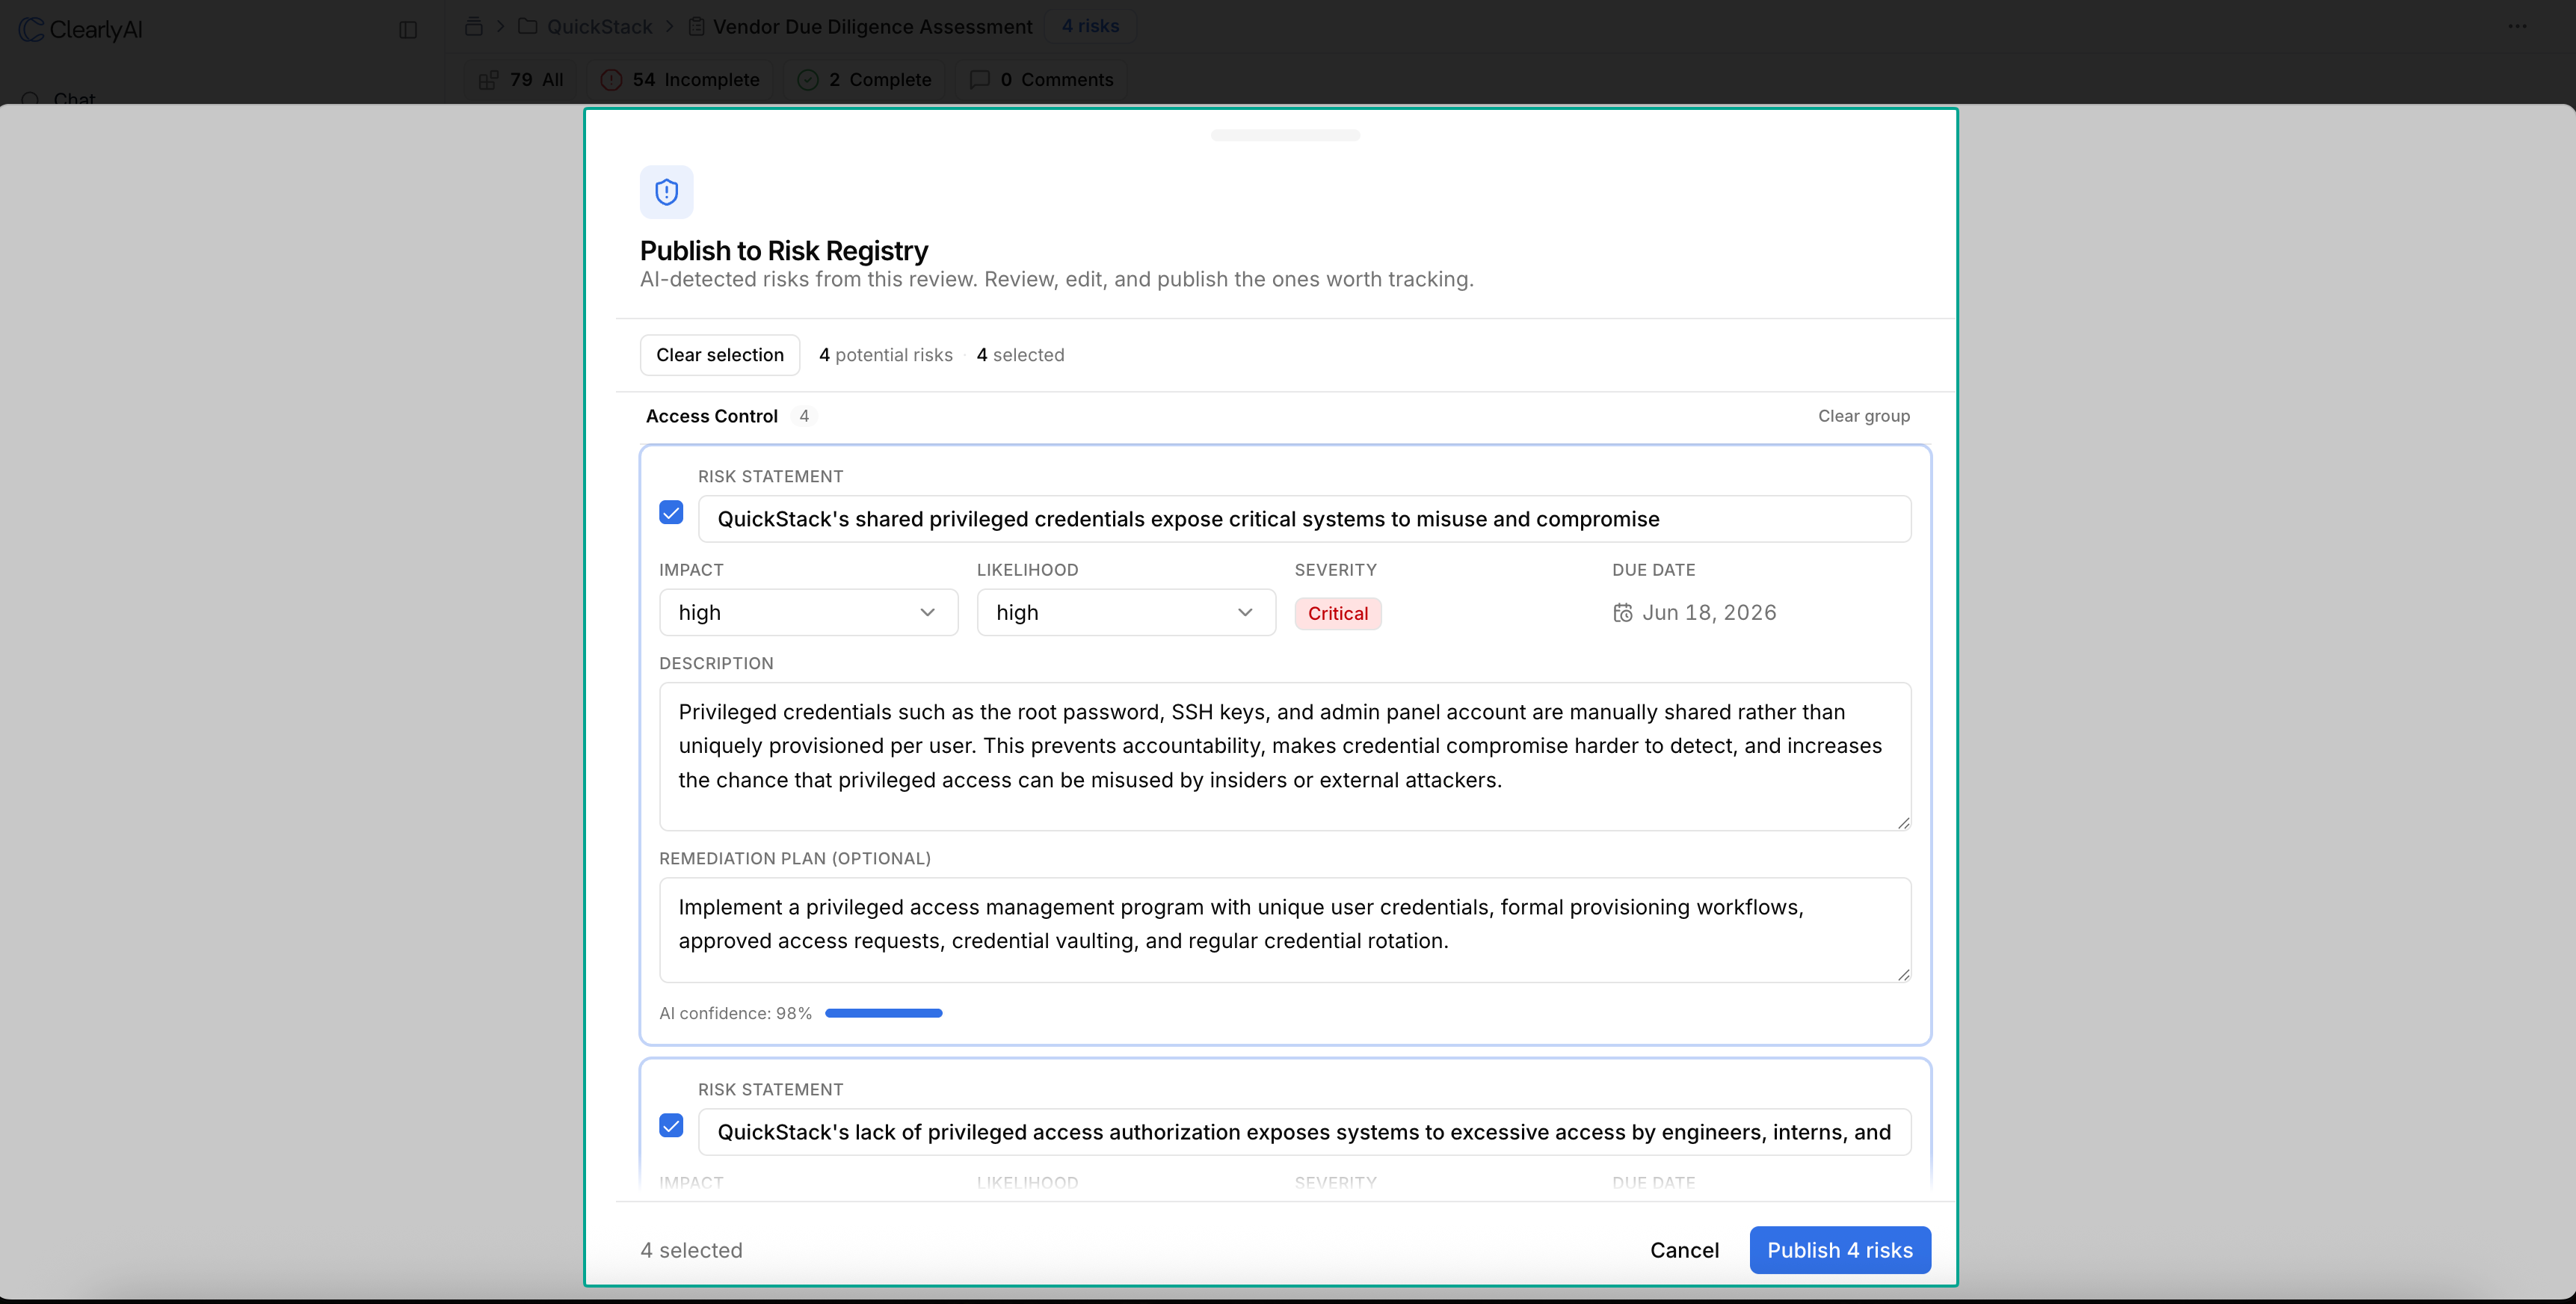
Clearly AI analyzes the answers in scope, detects candidate risks, and opens the Publish to Risk Registry panel where you can review them. Each detected risk shows an editable title, description, remediation plan, and scoring, along with an AI confidence indicator. Low-confidence detections are de-emphasized and left unselected, so you choose exactly which risks are worth tracking. You can retry an answer that failed to analyze, and risks already in the registry are marked so you don't publish duplicates.
Published risks are created directly in the Open state and link back to the source review and answer. Publishing works across all answer types. After publishing, the answer shows a risks published link that opens the Risk Registry filtered to that answer.
Manually: Click New Risk and enter the risk details yourself.
When creating a risk, you can optionally link it to a standardized definition in the Risk Catalog.
Create a risk manually
- Open Risks.
- Click New Risk.
- Enter Title and Description.
- Optionally set Impact and Likelihood (severity is derived from these), plus Category, Owner, and Project.
- Click Create Risk.
Manual risks start as draft risks.
Risk fields
Each risk can include:
- Title: short summary.
- Description: what the risk is and why it matters.
- Status: current lifecycle state.
- Impact: how serious the consequences would be if the risk occurred.
- Likelihood: probability of occurrence.
- Severity: derived from Impact and Likelihood using your organization's scoring matrix, or set directly when your organization uses severity-only scoring.
- Owner: person responsible for follow-up.
- Category: classification such as access control, data protection, or logging.
- Project: the project the risk applies to or was published from.
- Due Date: target date for remediation or decision. Assigned automatically from the severity SLA when a risk is published, and editable afterward.
- Remediation Plan: planned mitigation or fix.
- Linked Entities: related reviews, projects, tickets, or other entities.
- History: recorded field and status changes.
Risk scoring
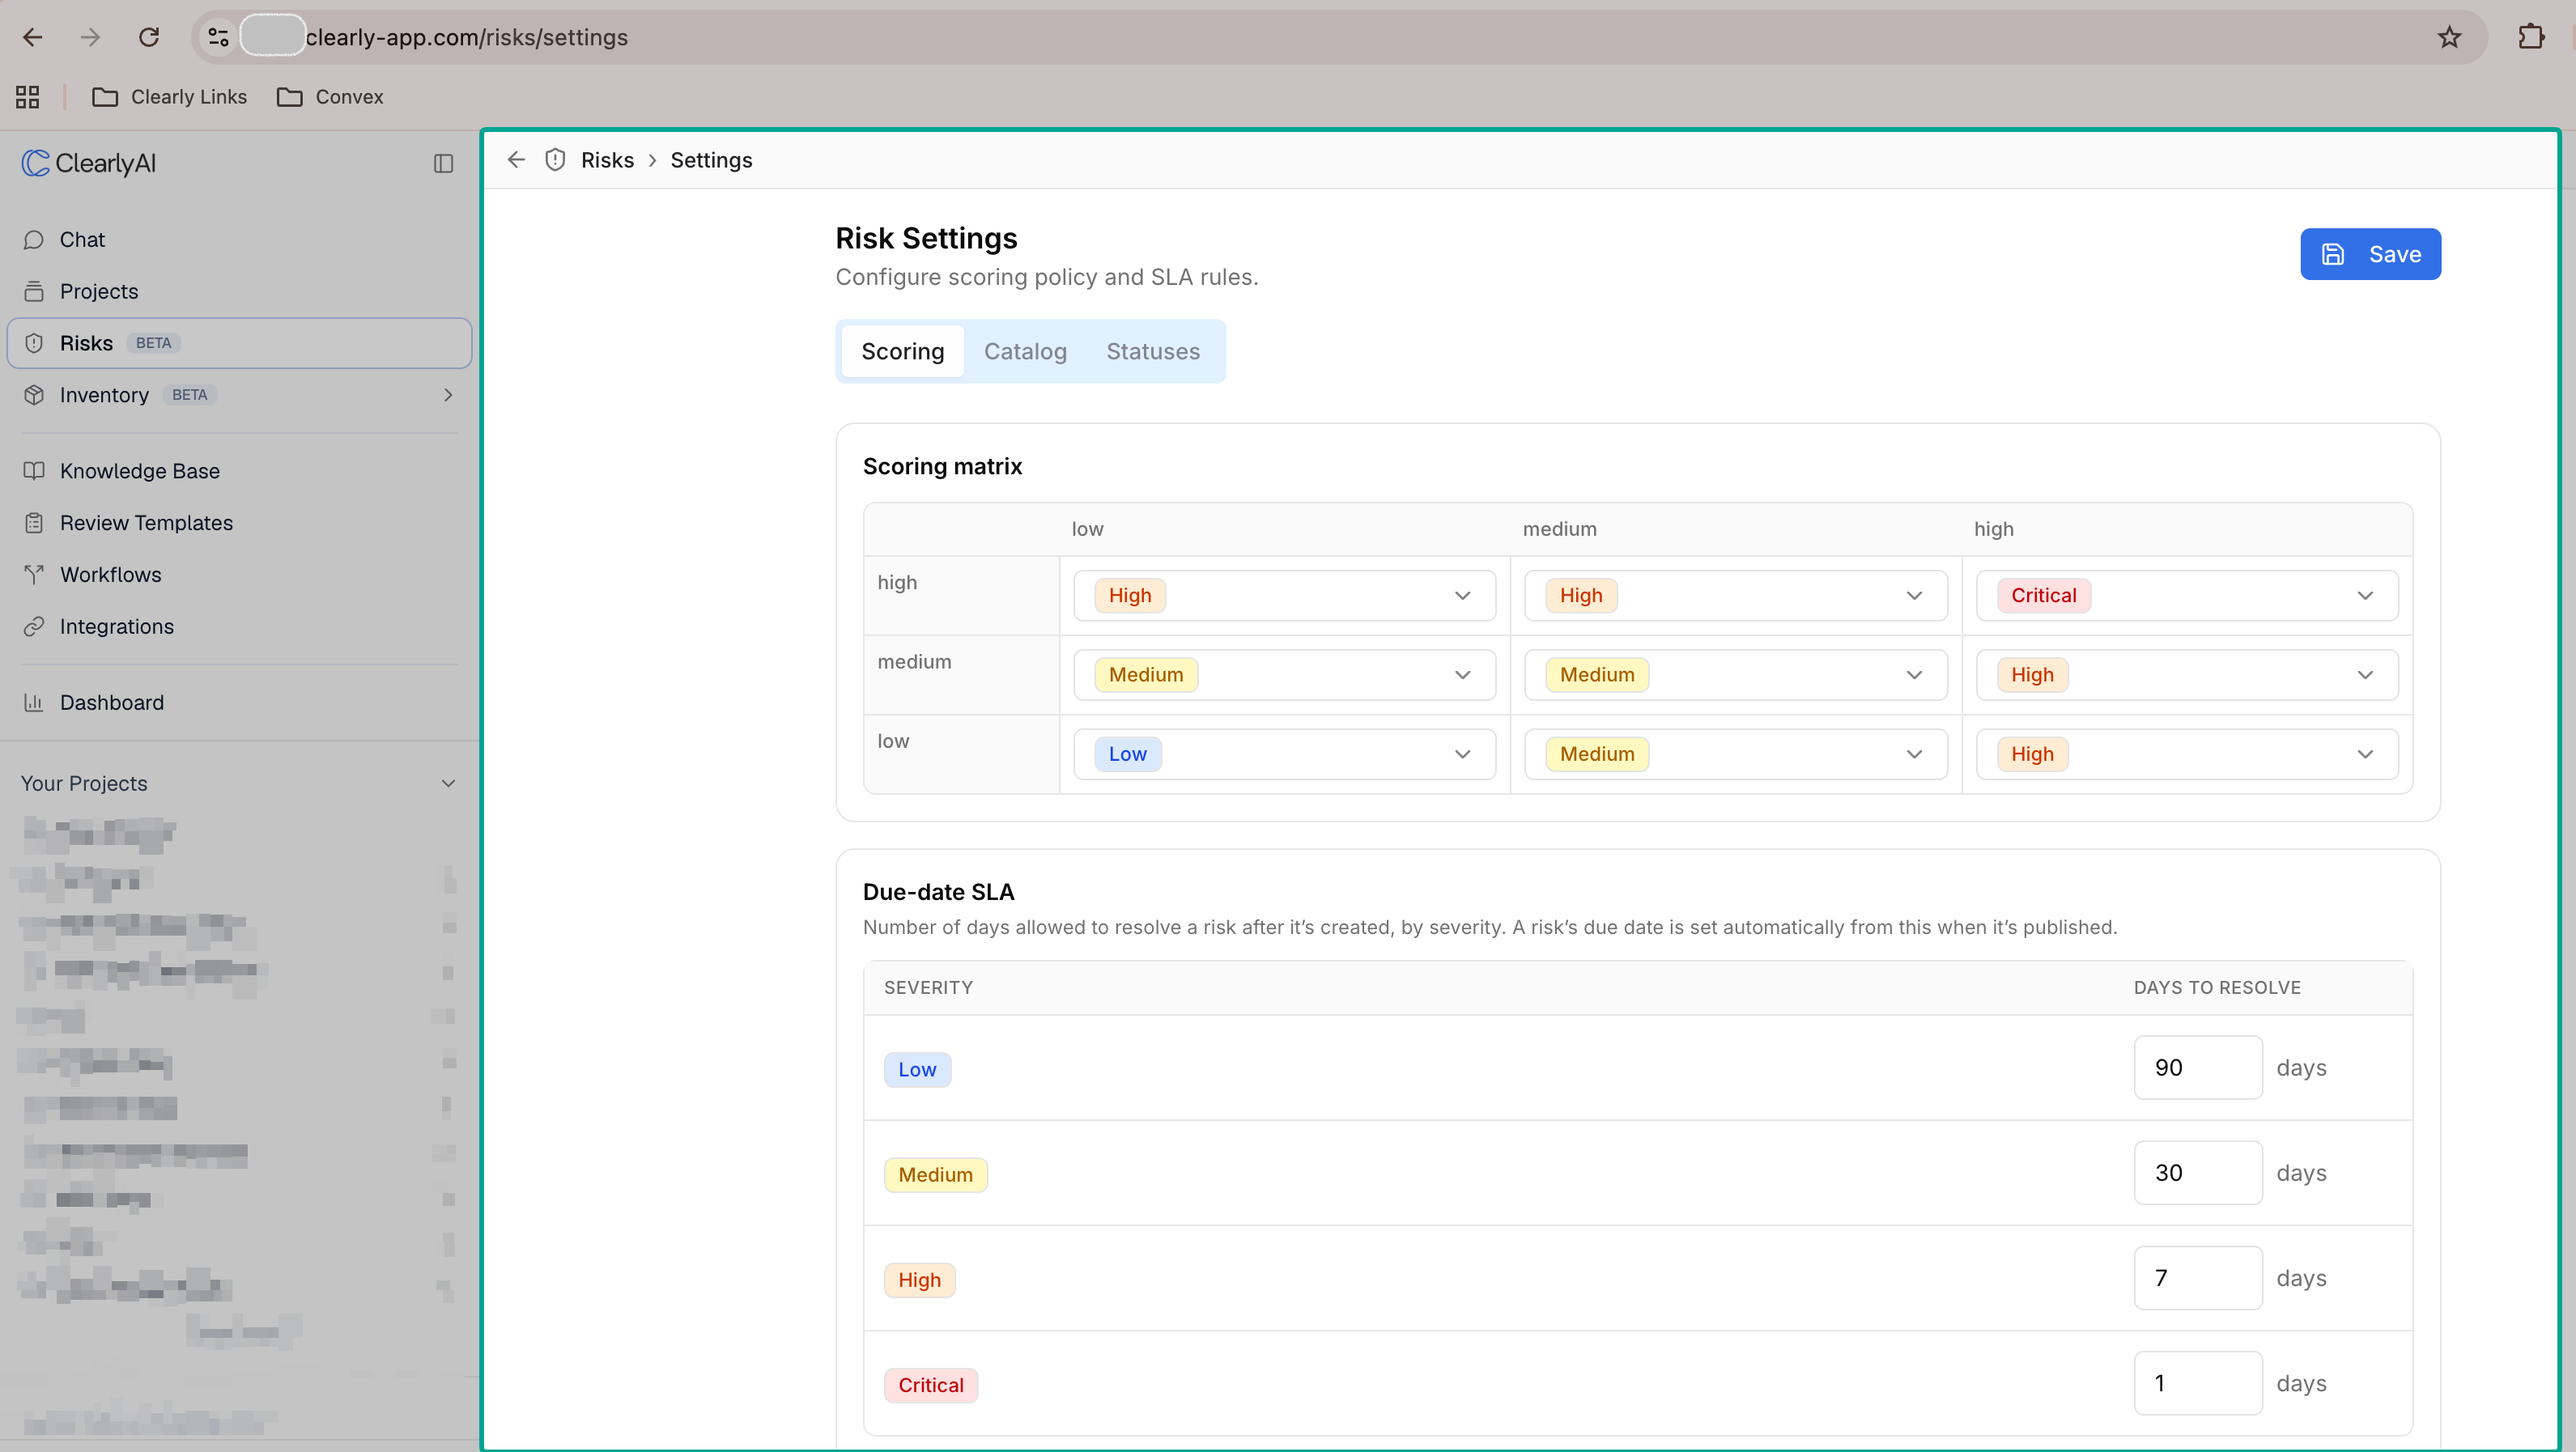
By default, Clearly AI derives a risk's Severity from its Impact and Likelihood using a scoring matrix. The default matrix is 3×3 (low, medium, high for each axis) and maps each combination to a severity of Low, Medium, High, or Critical. Hovering a severity shows how it was derived, for example Impact × Likelihood → Severity.
When a risk is published, its Due Date is set automatically from a per-severity SLA (by default 1 day for Critical, 7 for High, 30 for Medium, and 90 for Low).
Administrators configure scoring under Risk Settings → Scoring (/risks/settings):
- Severity matrix: choose the severity that each Impact × Likelihood combination produces.
- SLA table: set how many days to resolve risks of each severity, which drives the automatic due dates.
Organizations that prefer to set severity directly can use a severity-only methodology instead of the Impact × Likelihood matrix.
Triage draft risks
Draft risks need enough information to become actionable. Manually created risks start as drafts (risks published from reviews already arrive as Open).
For each draft risk:
- Open the risk.
- Confirm the Description.
- Set Impact and Likelihood.
- Assign an Owner.
- Set Category, Project, and Due Date when useful.
- Add or update the Remediation Plan.
- Move Status from draft to open when the risk is ready to track.
The draft banner on the list page is a shortcut to these untriaged risks.
Status lifecycle
Risk statuses are:
- draft
- open
- mitigating
- accepted
- resolved
- closed
Allowed transitions depend on the current status.
- draft can move to open or closed.
- open can move to mitigating, accepted, resolved, or closed.
- mitigating can move back to open, or forward to accepted, resolved, or closed.
- accepted and resolved can reopen or close.
- closed is terminal in the current UI.
Risks published from reviews start in open. Manually created risks start in draft.
Use Accept Risk instead of the status dropdown when accepting an open or mitigating risk.
Accept a risk
Users with accept permission can accept risks that are open or mitigating.
- Open the risk.
- Click Accept Risk.
- Enter Justification.
- Optionally enter Residual Risk Notes.
- Click Accept Risk.
Accepted risks show the acceptance justification and residual risk notes on the risk detail page.
Link related entities
Use Linked Entities to connect a risk to the work or evidence around it.
Link types include:
- Relates to
- Caused by
- Mitigates
- Blocks
Risks published from reviews include a deep-link back to the source review and answer under Linked Entities. You can add more links manually when you have edit permission.
Bulk update risks
From the risks table, select one or more risks to show bulk actions.
Available bulk actions include:
- Set status.
- Set severity.
- Set owner.
- Delete selected draft risks.
Only draft risks can be deleted.
Risk Catalog
The Risk Catalog is a library of reusable, standardized risk definitions for your organization. Instead of describing the same risk differently on every project, you maintain a curated set of known risks (catalog risks) and link your live risks to them. This gives your team a common risk language, consistent classification, and a traceable link from each live risk back to its standard definition.
The Risk Catalog is part of the Risk Registry beta and uses the same access. Anyone who can edit risks can create, publish, and import catalog risks. Only administrators can delete them, and only drafts can be deleted.
Open the catalog
Open Risks, then go to Risk Settings → Catalog (/risks/settings).
The Catalog tab lists your catalog risks with:
- Search, and filters for Status and Category
- Columns for ID, name, category, default severity, status, and version
- New catalog risk when you have edit permission
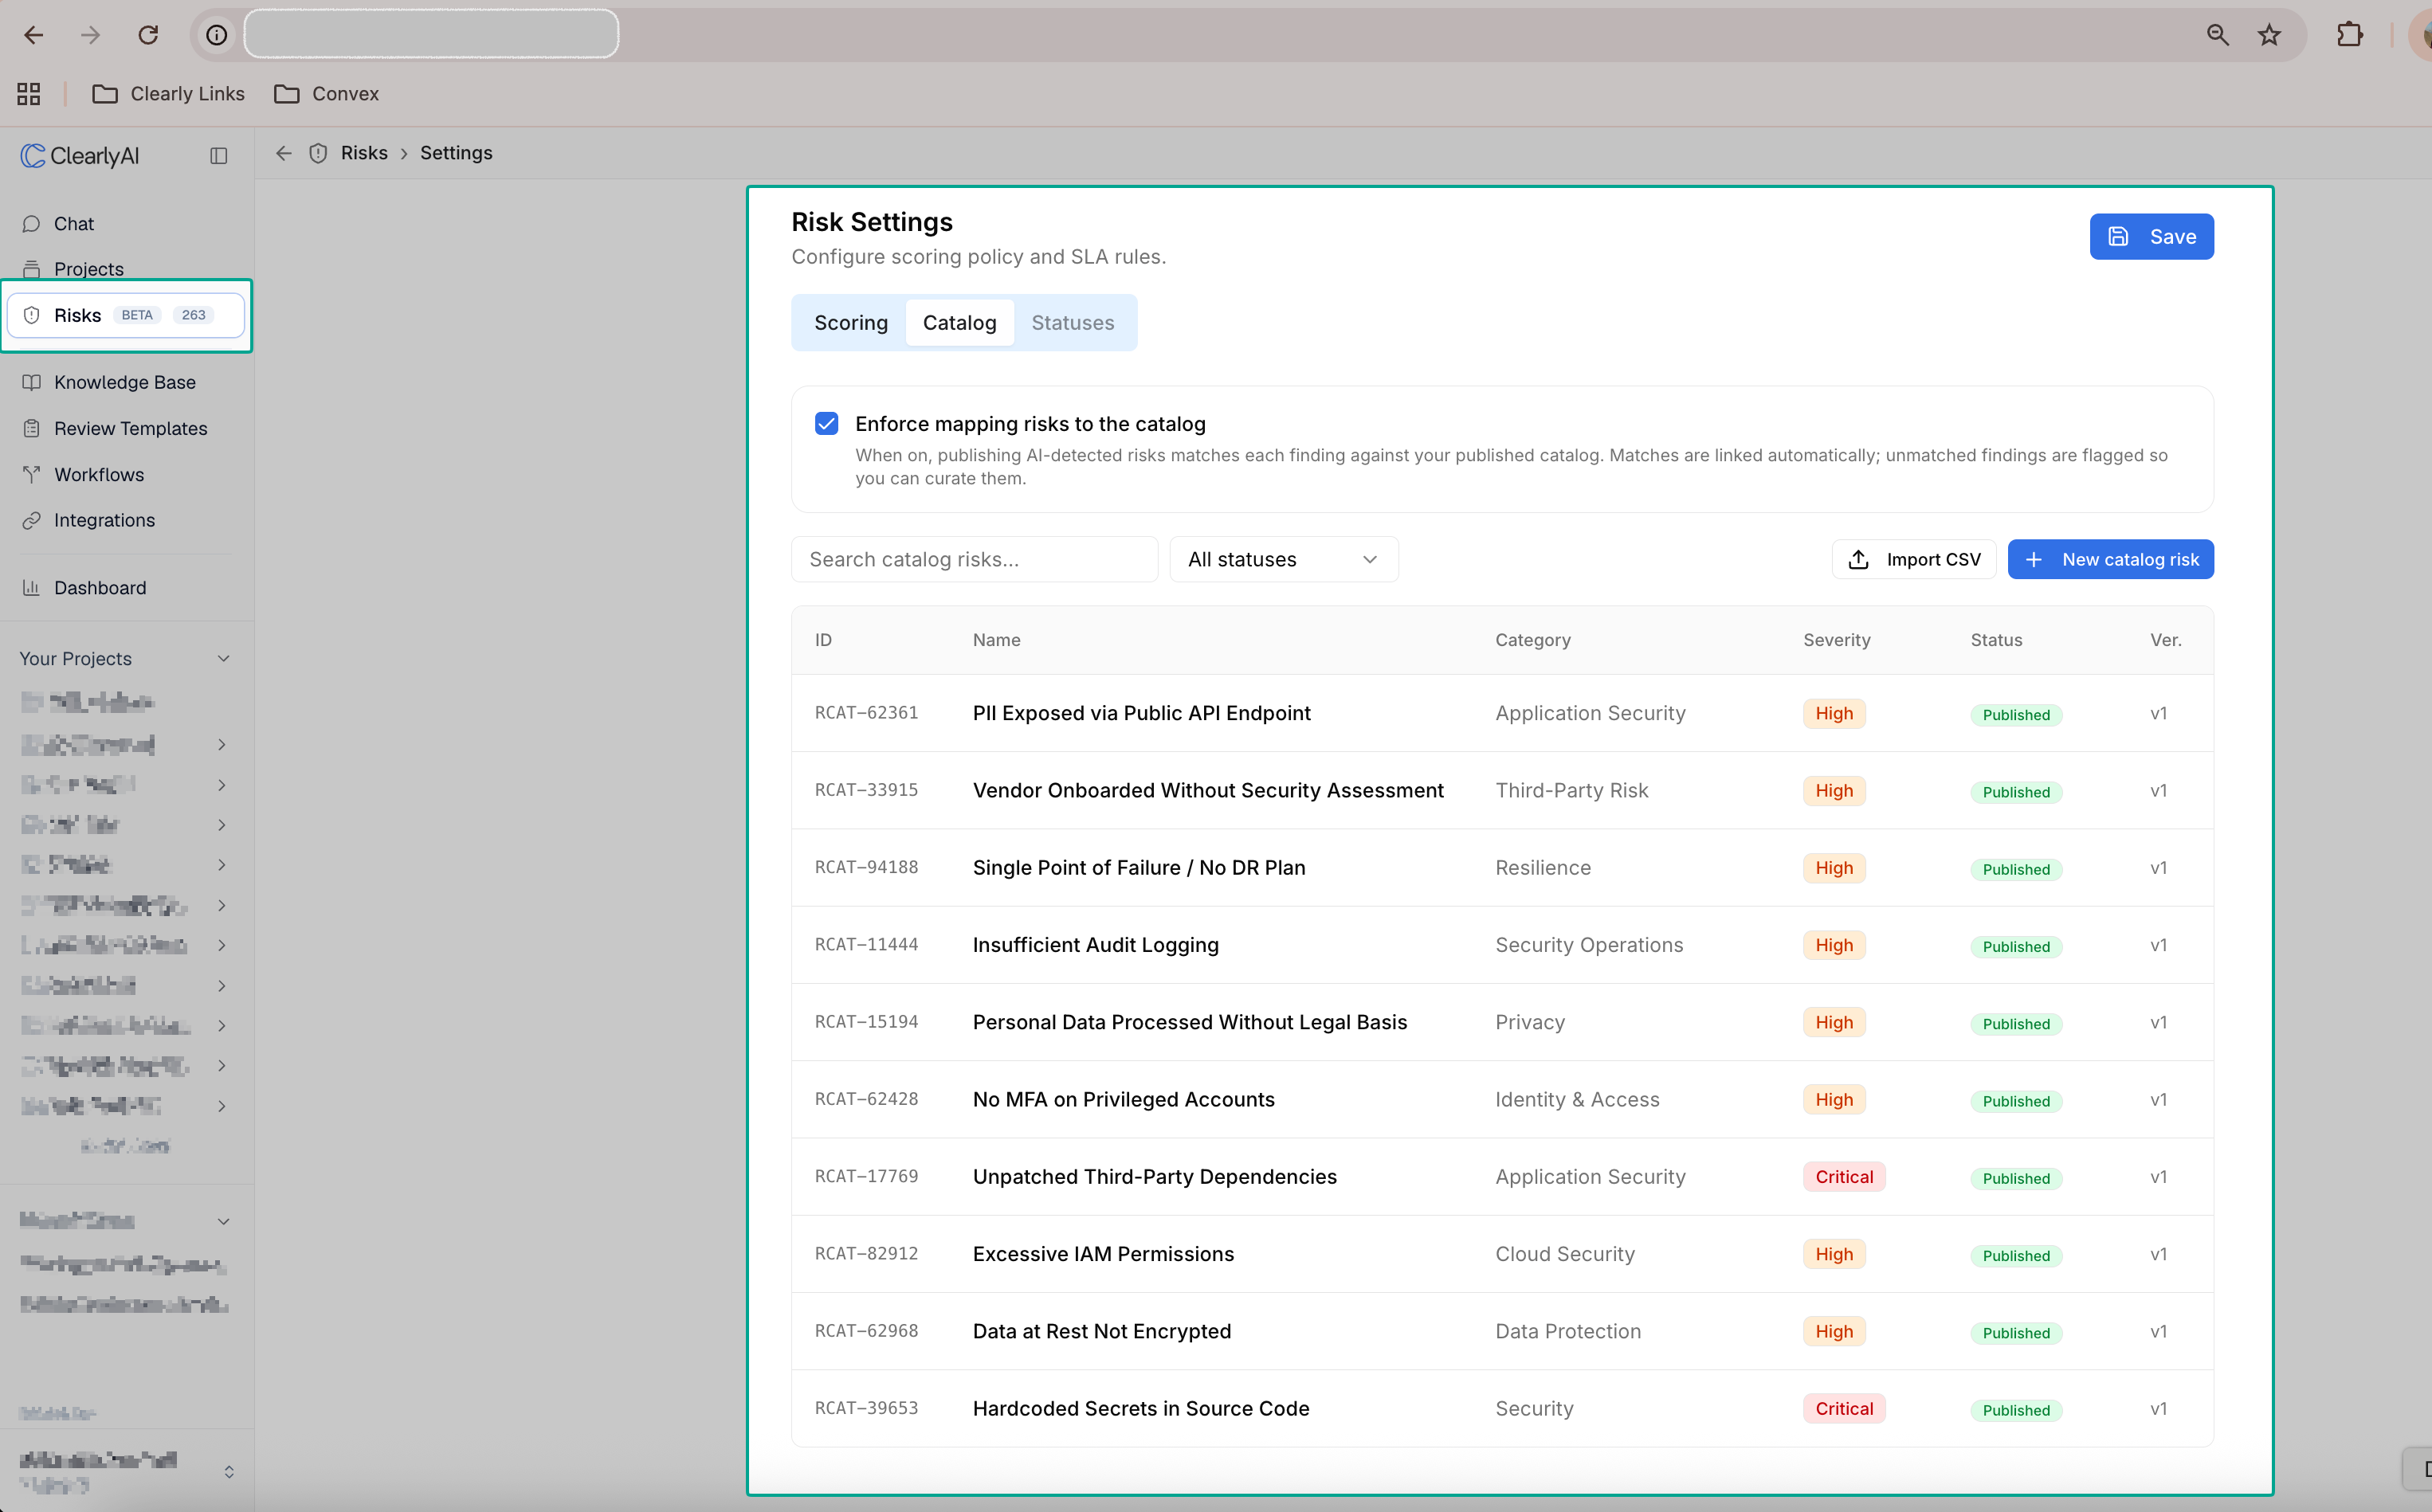
Figure 1. The Catalog tab in Risk Settings, with search, a status filter, the catalog risks table, Import CSV, and New catalog risk.
Catalog risk fields
Each catalog risk can include:
- Name: short title for the risk type.
- Description: what the risk is and why it matters.
- Risk Statement: a standardized statement of the risk, suitable for reuse.
- Category and Subcategory: classification for grouping and reporting.
- Default Impact, Default Likelihood, and Default Severity: the standard scoring for this risk type. Severity is derived from impact and likelihood using your organization's scoring matrix, the same way live risks are scored.
- Suggested Controls: recommended mitigations.
- Mapped Frameworks: related frameworks or standards, entered as free text.
- Status: draft, published, or archived.
- Version: increases each time a published catalog risk is edited.
Create and publish a catalog risk
- In the Catalog tab, click New catalog risk.
- Enter at least a Name and Description, and set defaults such as impact, likelihood, category, and suggested controls.
- Save it. The catalog risk starts as a draft.
- When it is ready to use, Publish it. Only published catalog risks can be linked to live risks.
- Archive a catalog risk to retire it without affecting the risks already linked to it.
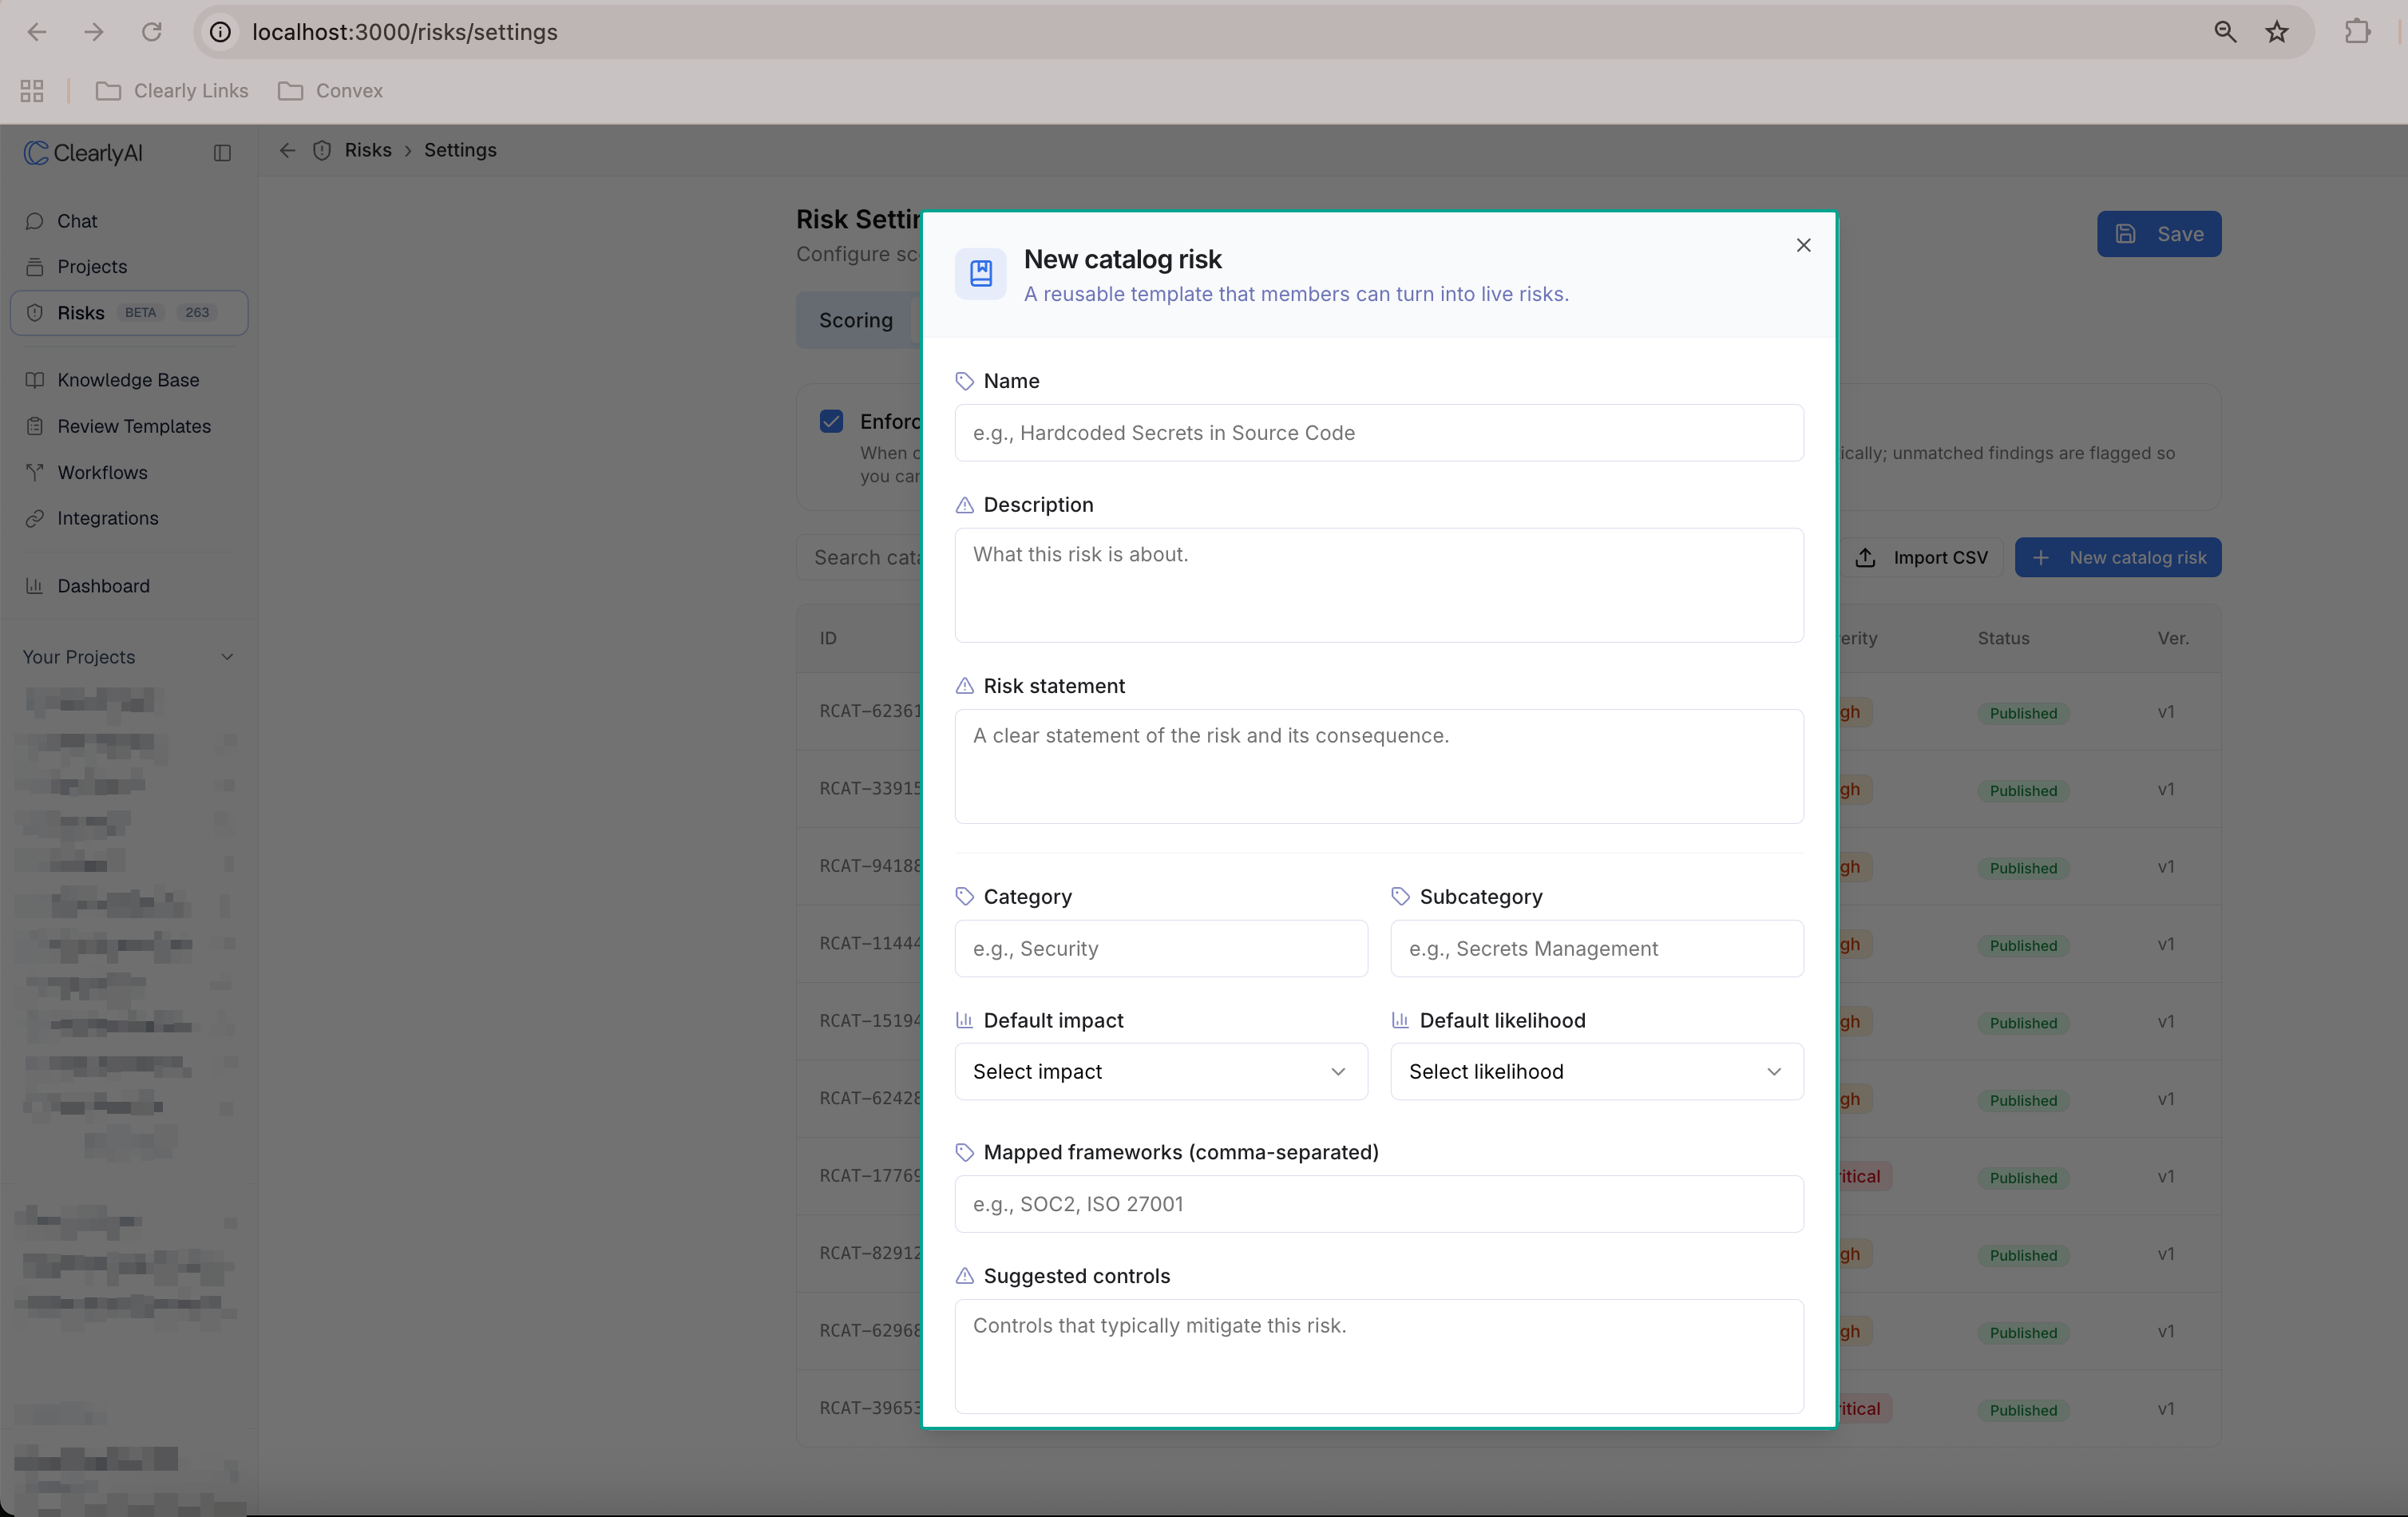
Figure 2. The New catalog risk form for authoring a reusable risk definition.
Editing a published catalog risk raises its version, while risks already linked to it keep the version they were linked at. Only draft catalog risks can be deleted; archive published ones instead.
Import catalog risks from a CSV
To build the catalog quickly, use Import CSV to add many catalog risks at once. Imported catalog risks are created as drafts. Each row is reported as created, updated, skipped, or failed, with a reason for anything that did not import. Re-importing the same file updates matching catalog risks instead of creating duplicates.
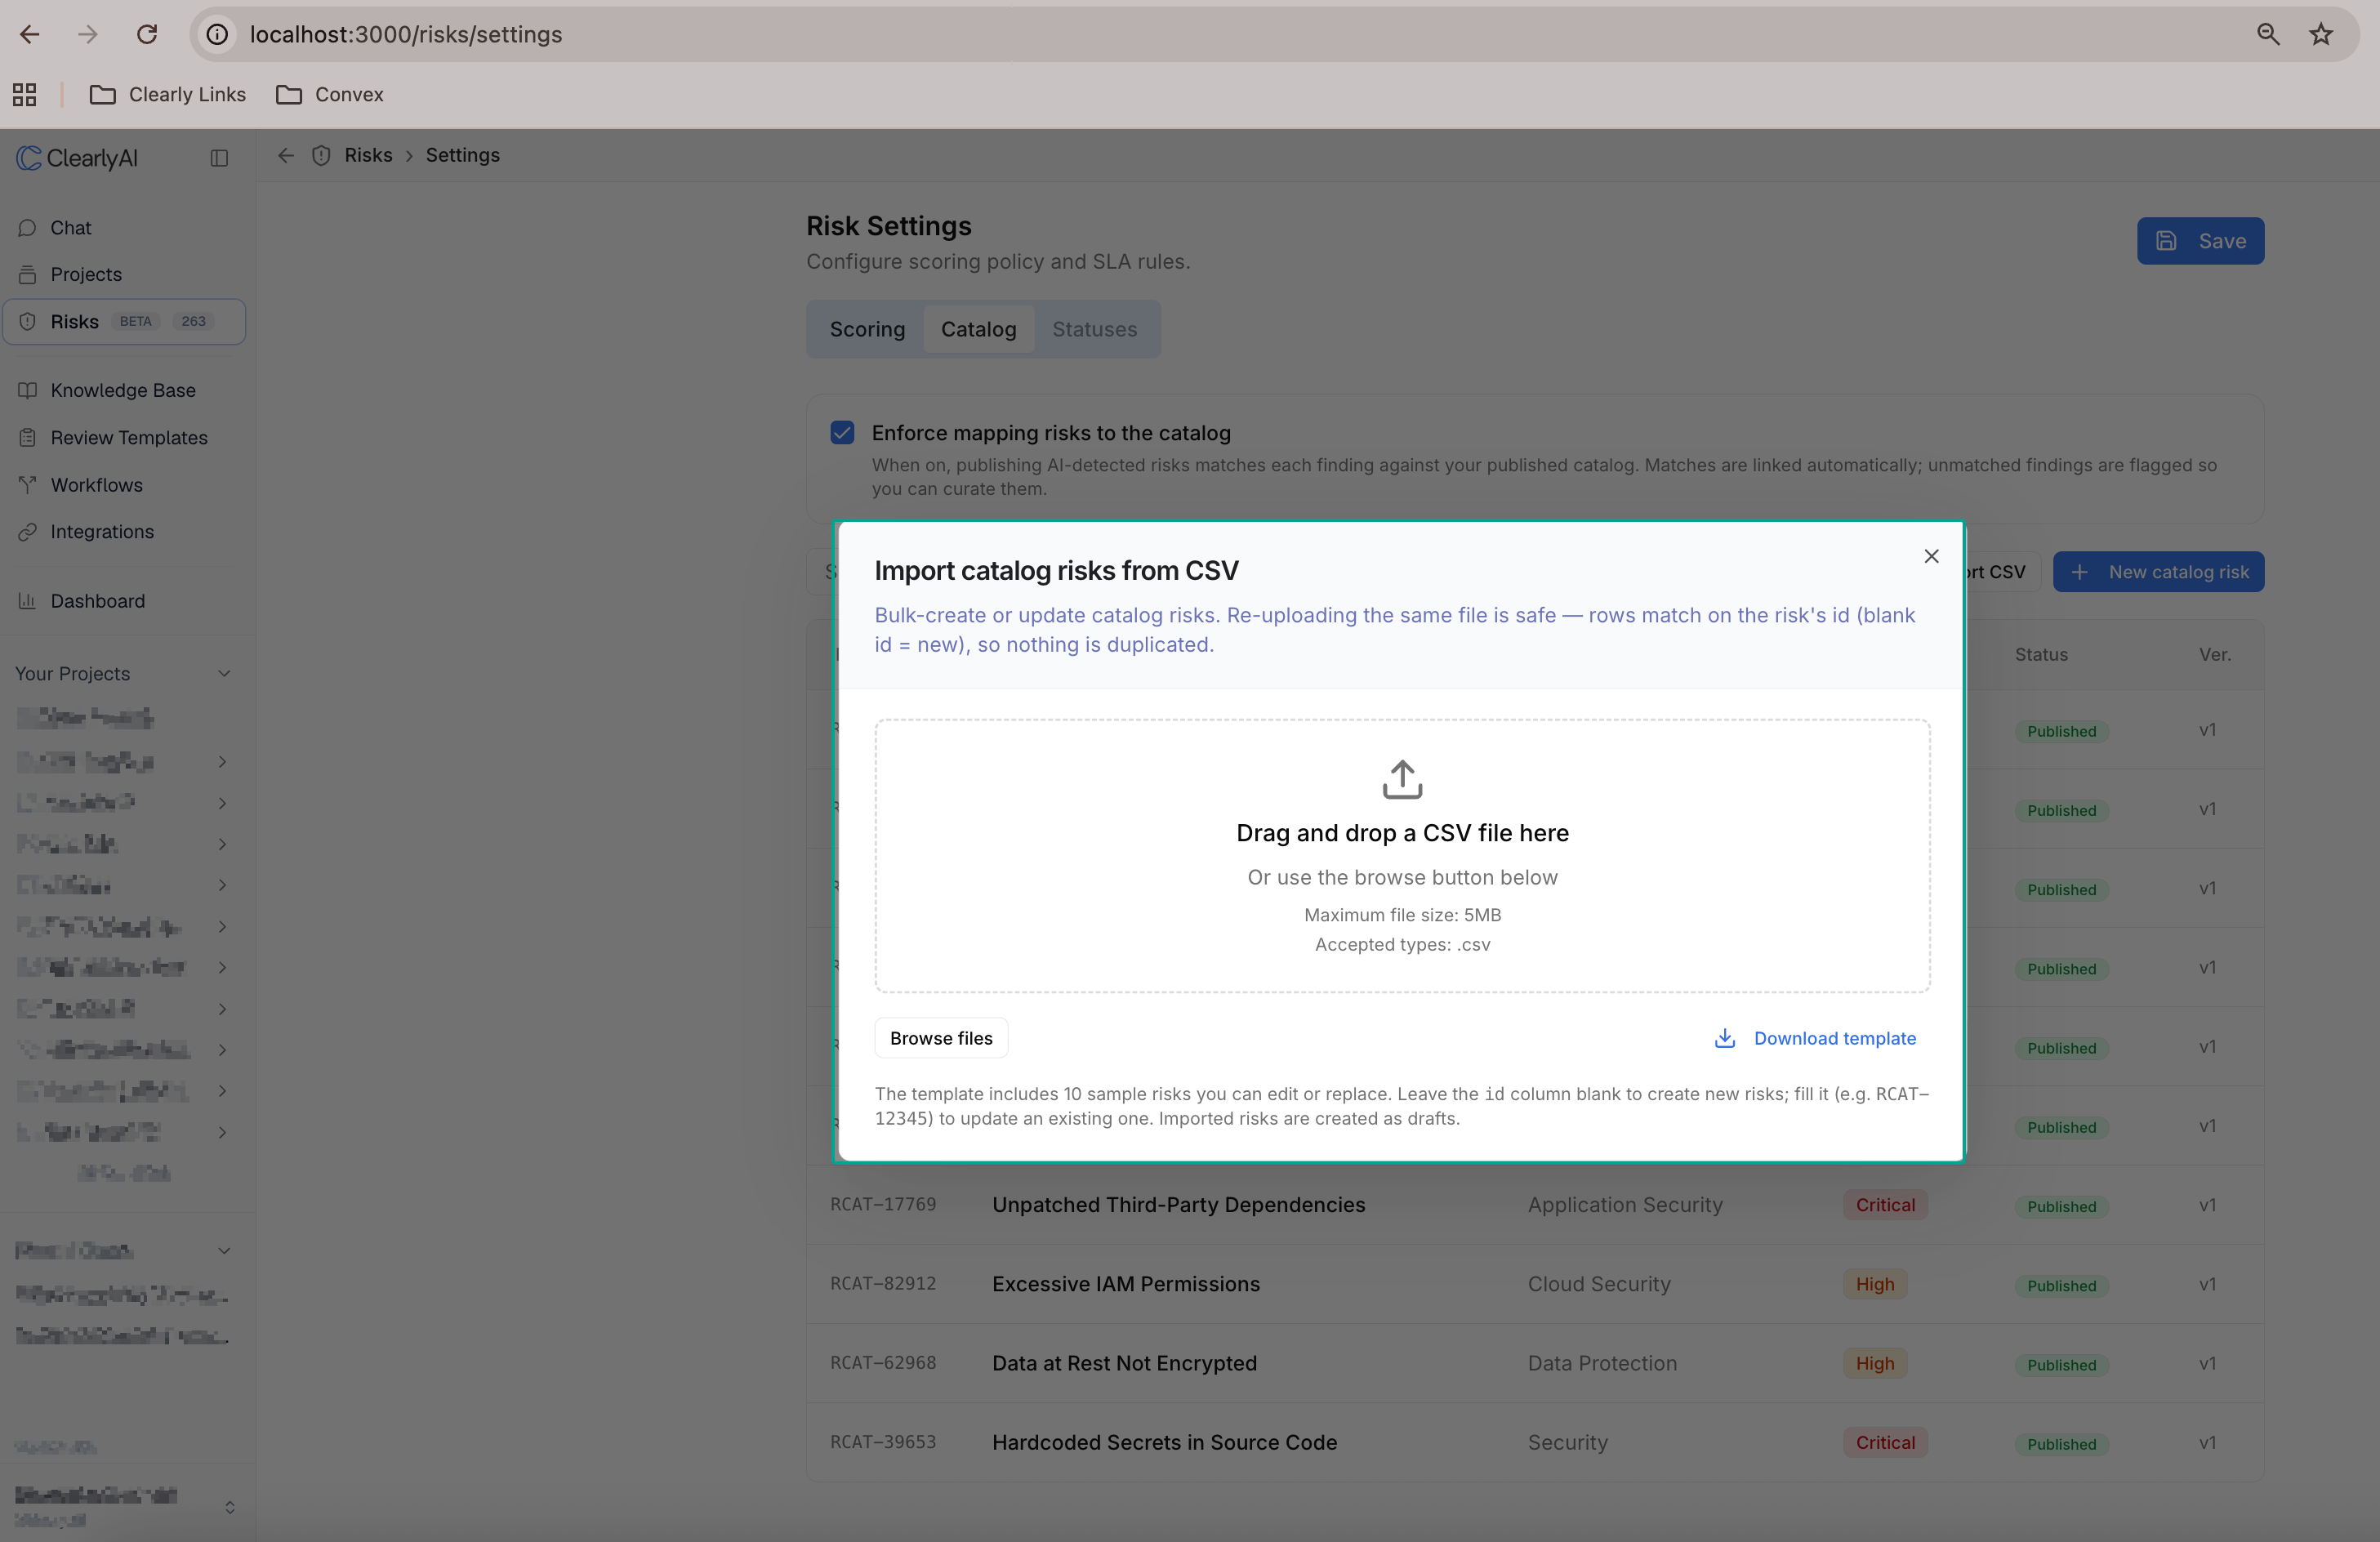
Figure 3. The Import catalog risks from CSV dialog, with a downloadable template. Imported risks are created as drafts.
Link a risk to the catalog
Linking records that a live risk corresponds to a standard catalog definition. It stores the link and the catalog risk's version; it does not change any of the risk's own fields.
- When creating a risk: in New Risk, use the optional Catalog field to associate the new risk with a published catalog risk.
- On an existing risk: open the risk and use Link to catalog in its properties. You can change or remove the link later.
A linked risk shows its catalog risk ID and version on the risk detail page.
Track catalog adoption
- Filter the Risk Registry by Catalog Item to see every live risk linked to a given catalog risk.
- Each catalog risk shows how many live risks are linked to it, with a shortcut to that filtered list.
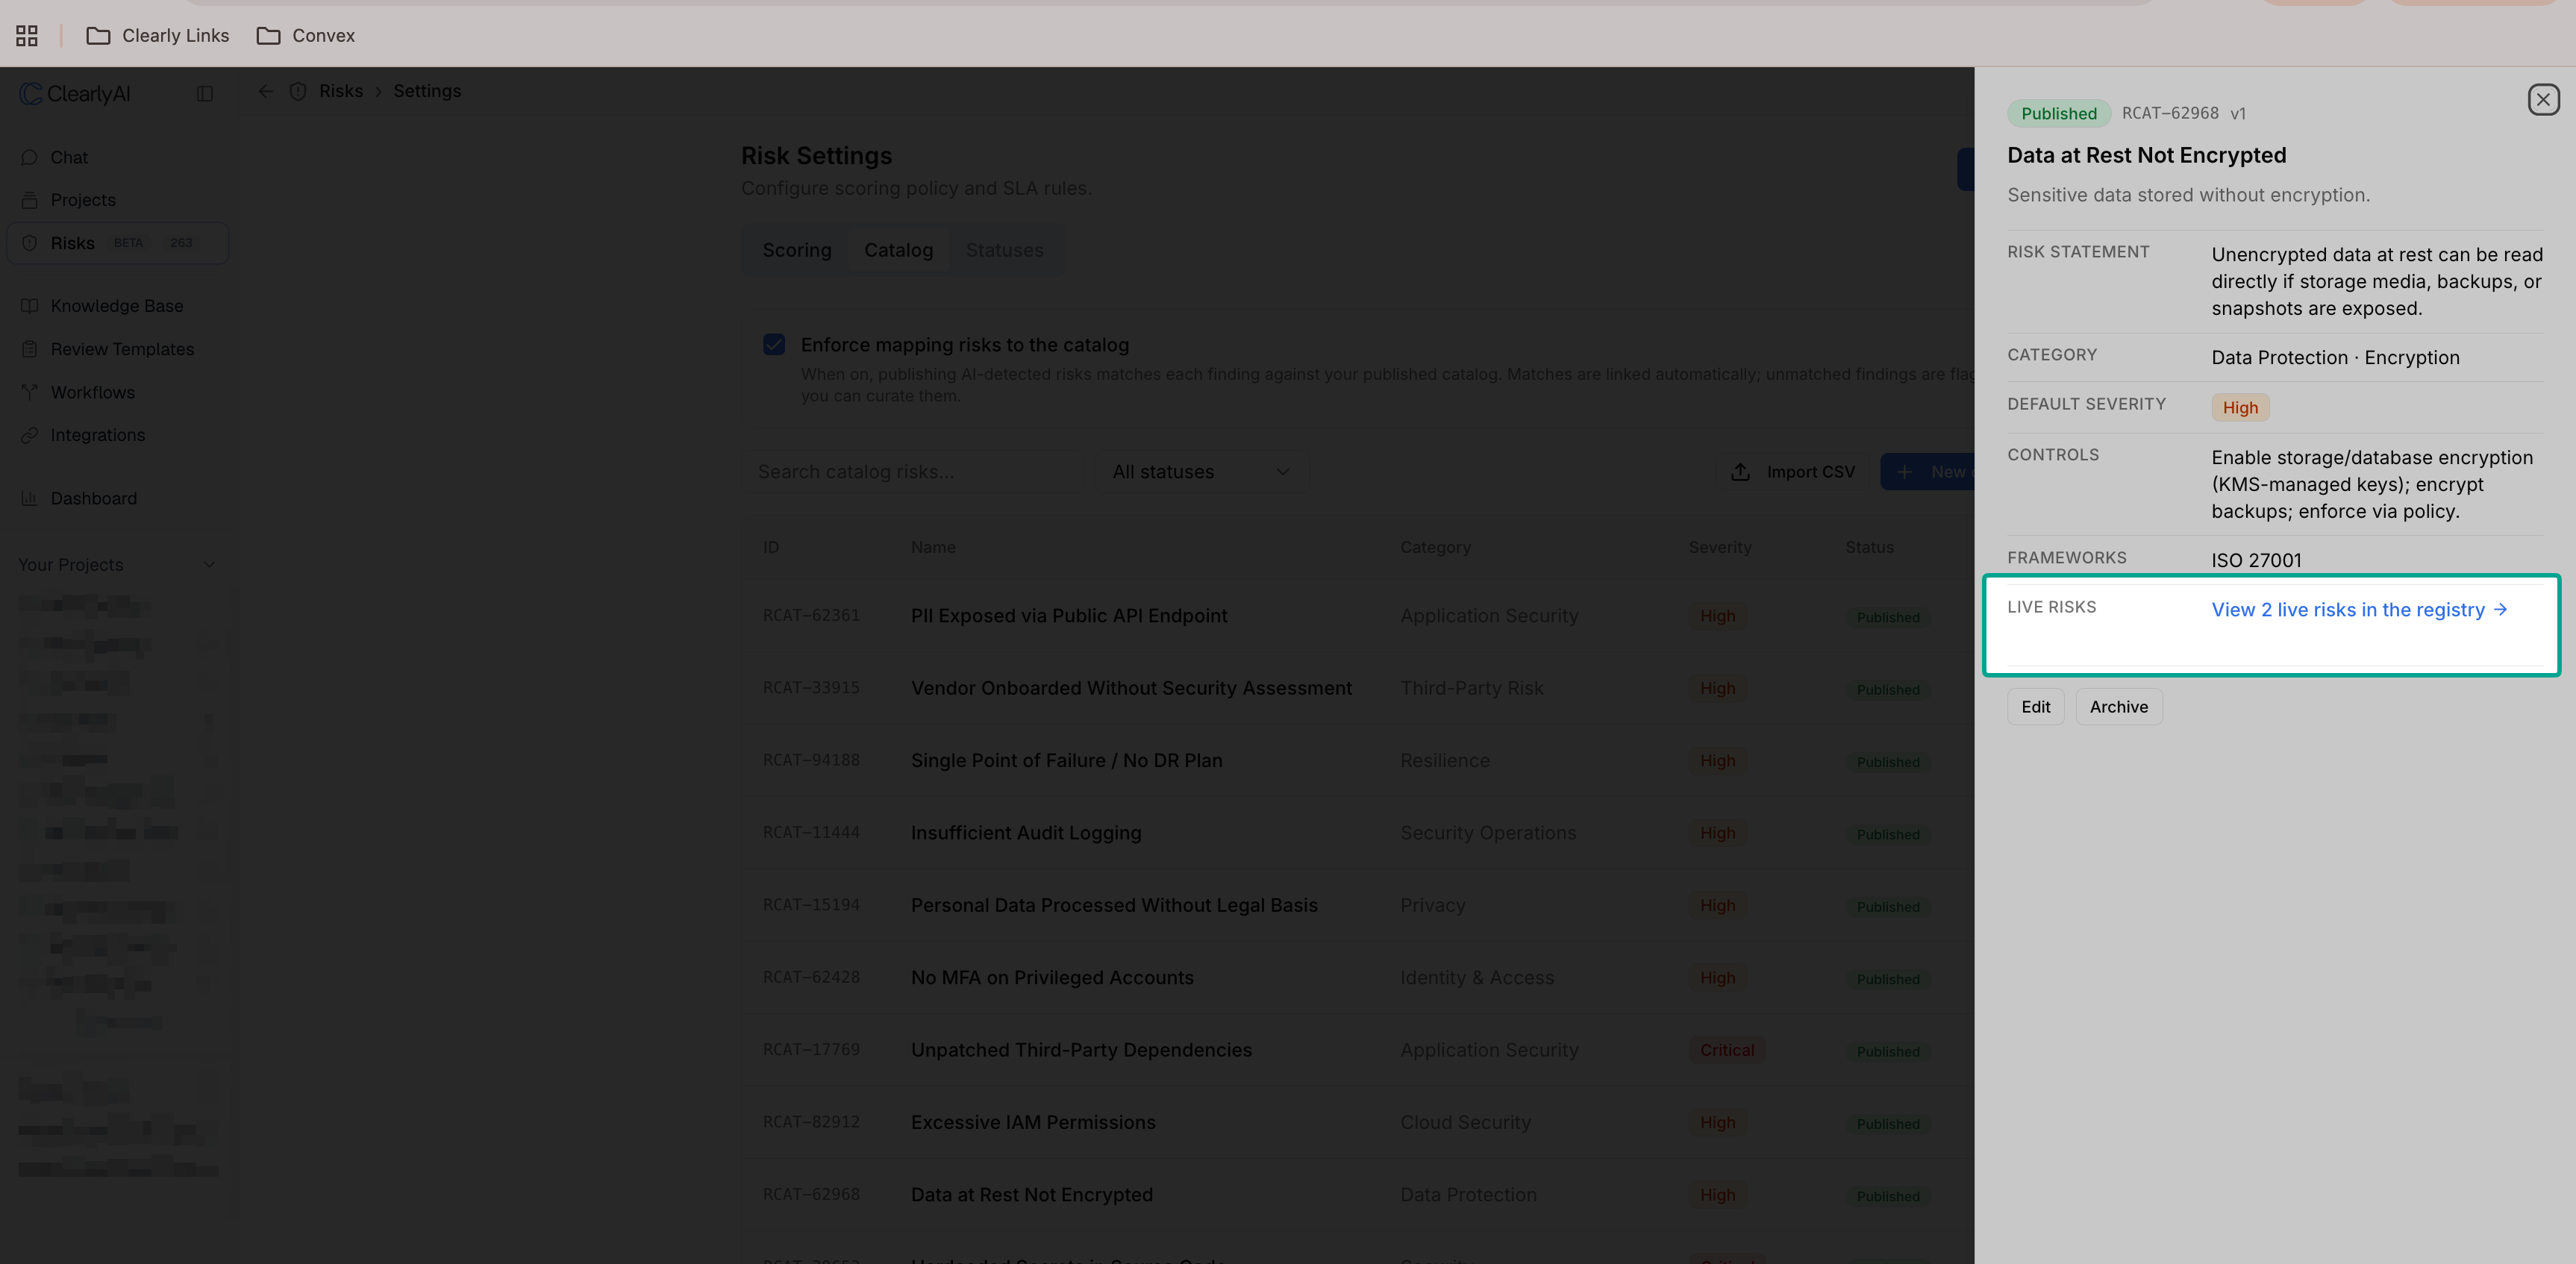
Figure 4. A catalog risk's detail panel, showing the number of live risks linked to it with a shortcut to the filtered Risk Registry.
Require catalog mapping when publishing
Administrators can require that risks published from a review are mapped to the catalog. When this is on, Clearly AI matches each detected risk against your published catalog risks during Publish to Risk Registry, shows the matched catalog risk, and asks you to map each one before publishing, so promoted risks stay tied to standard definitions.
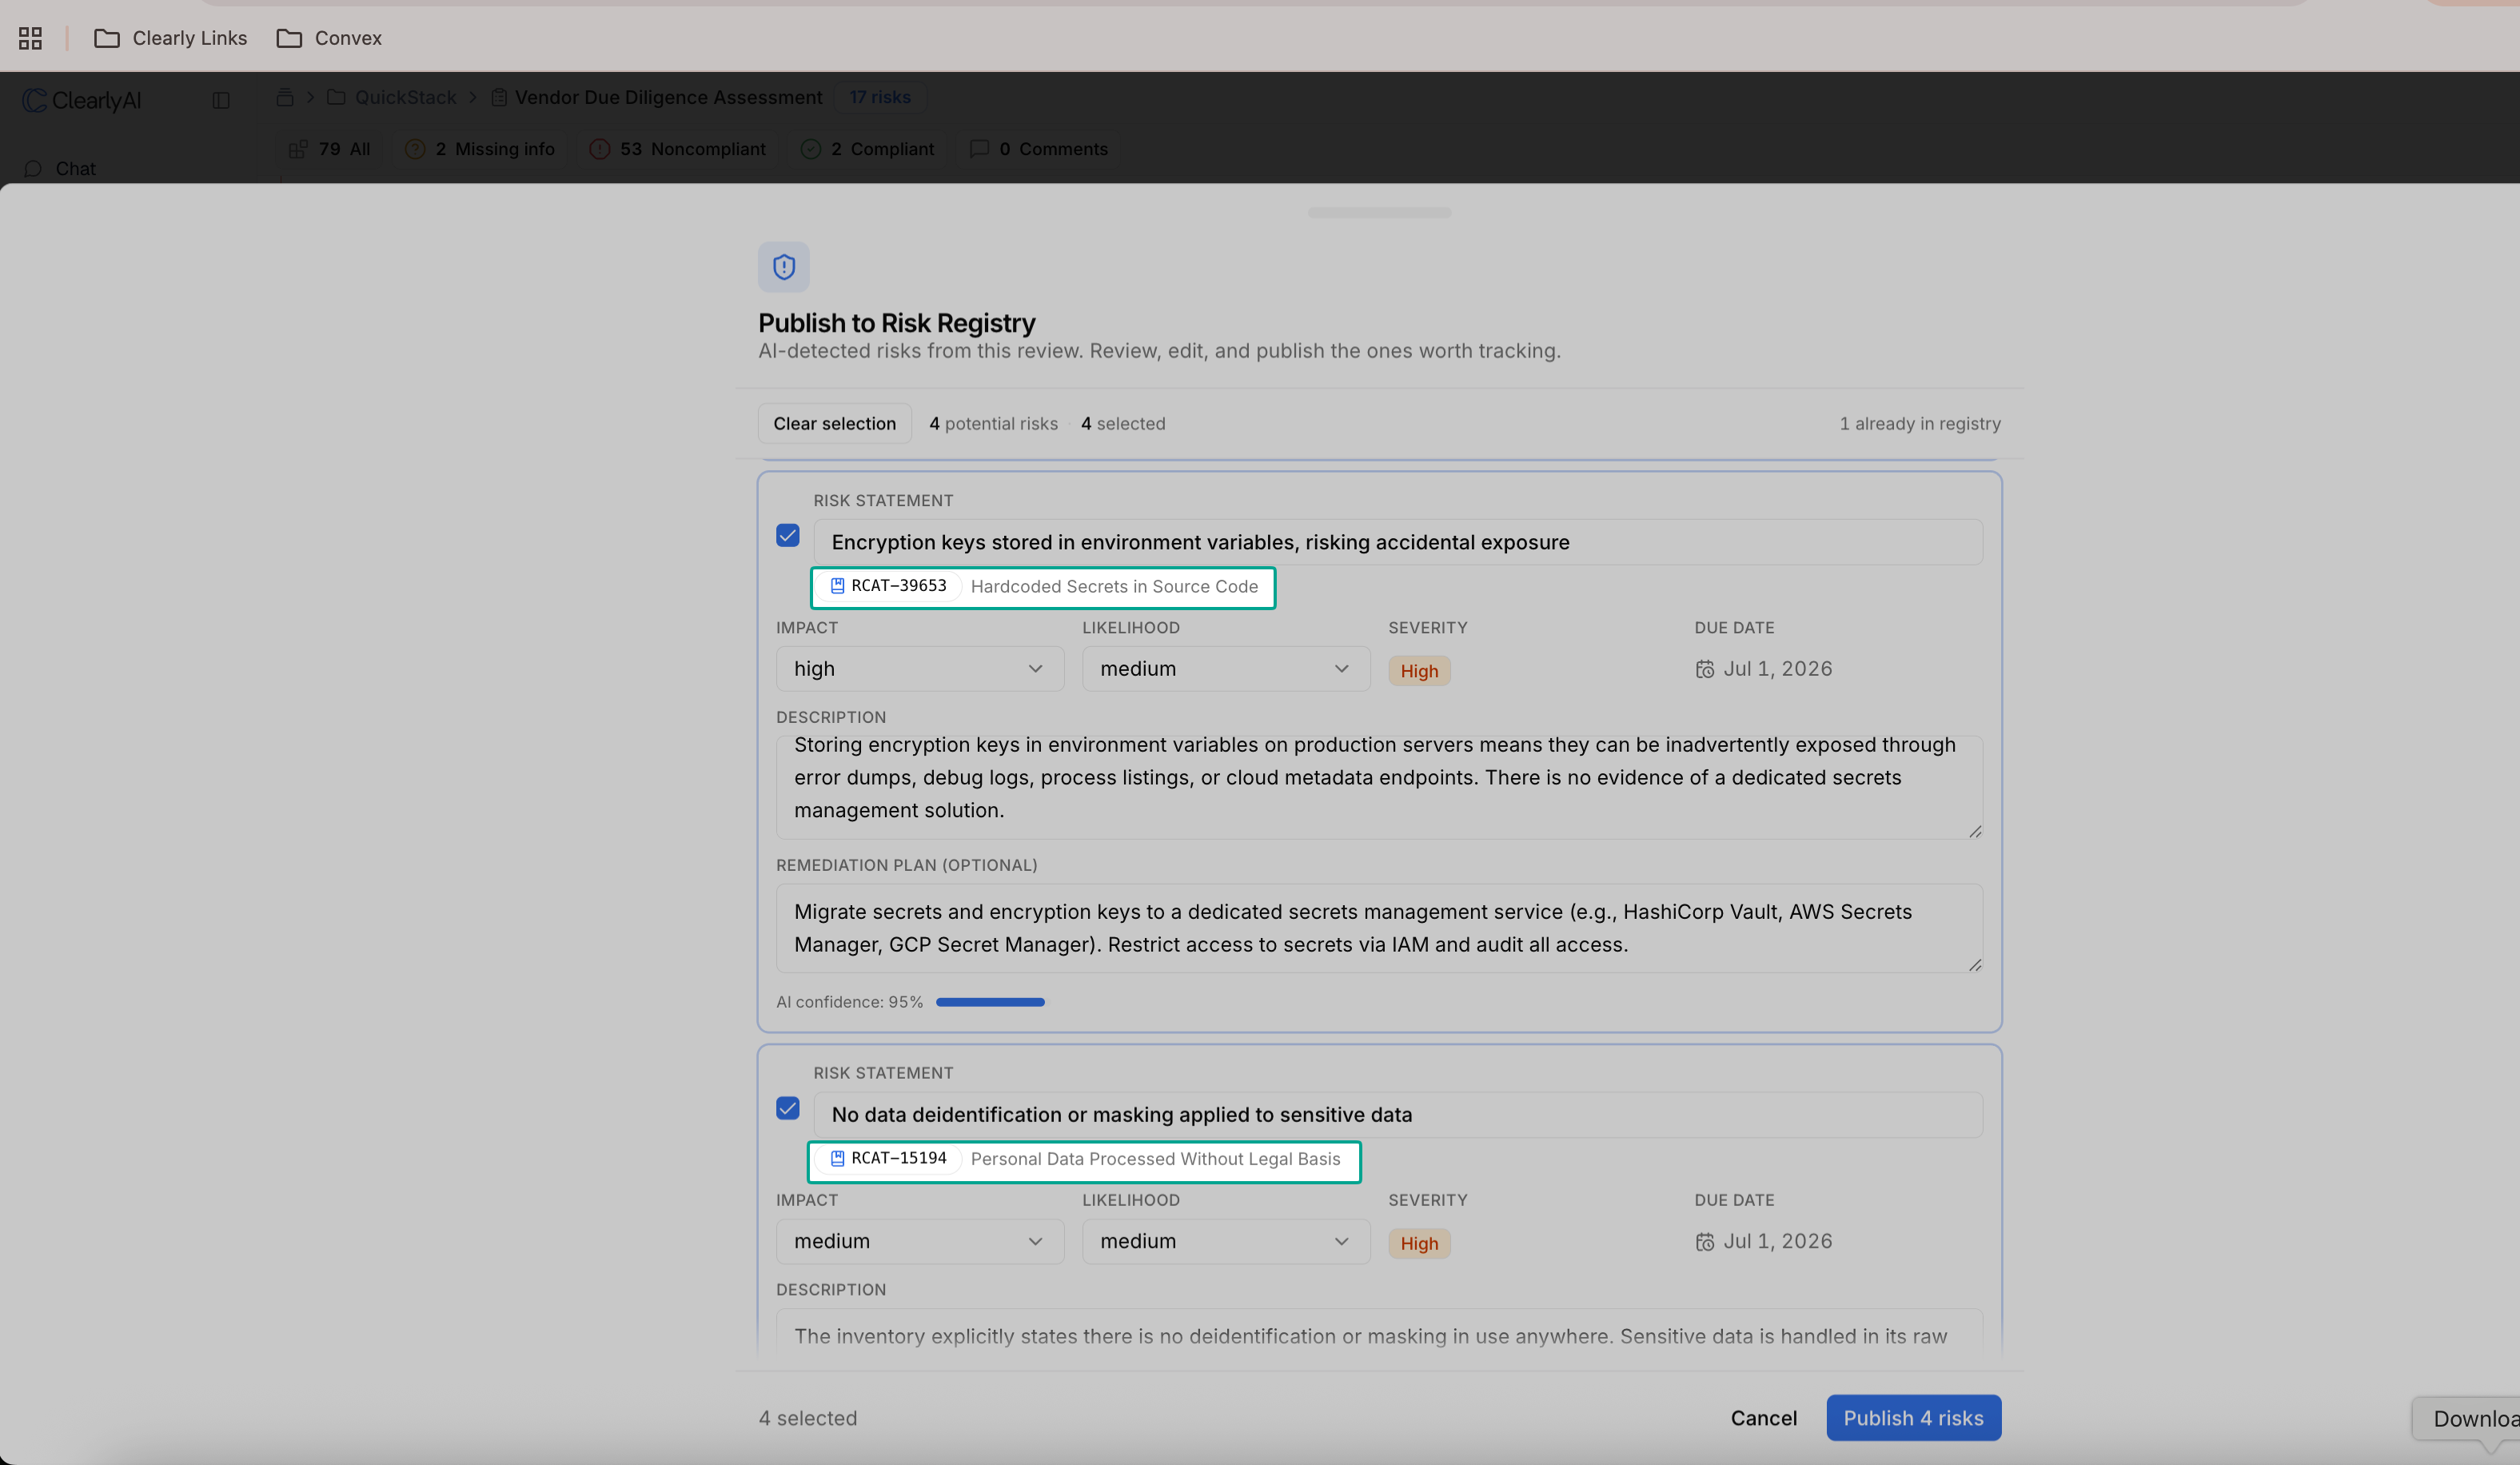
Figure 5. With catalog mapping enforced, Publish to Risk Registry shows the catalog risk each detected finding maps to.